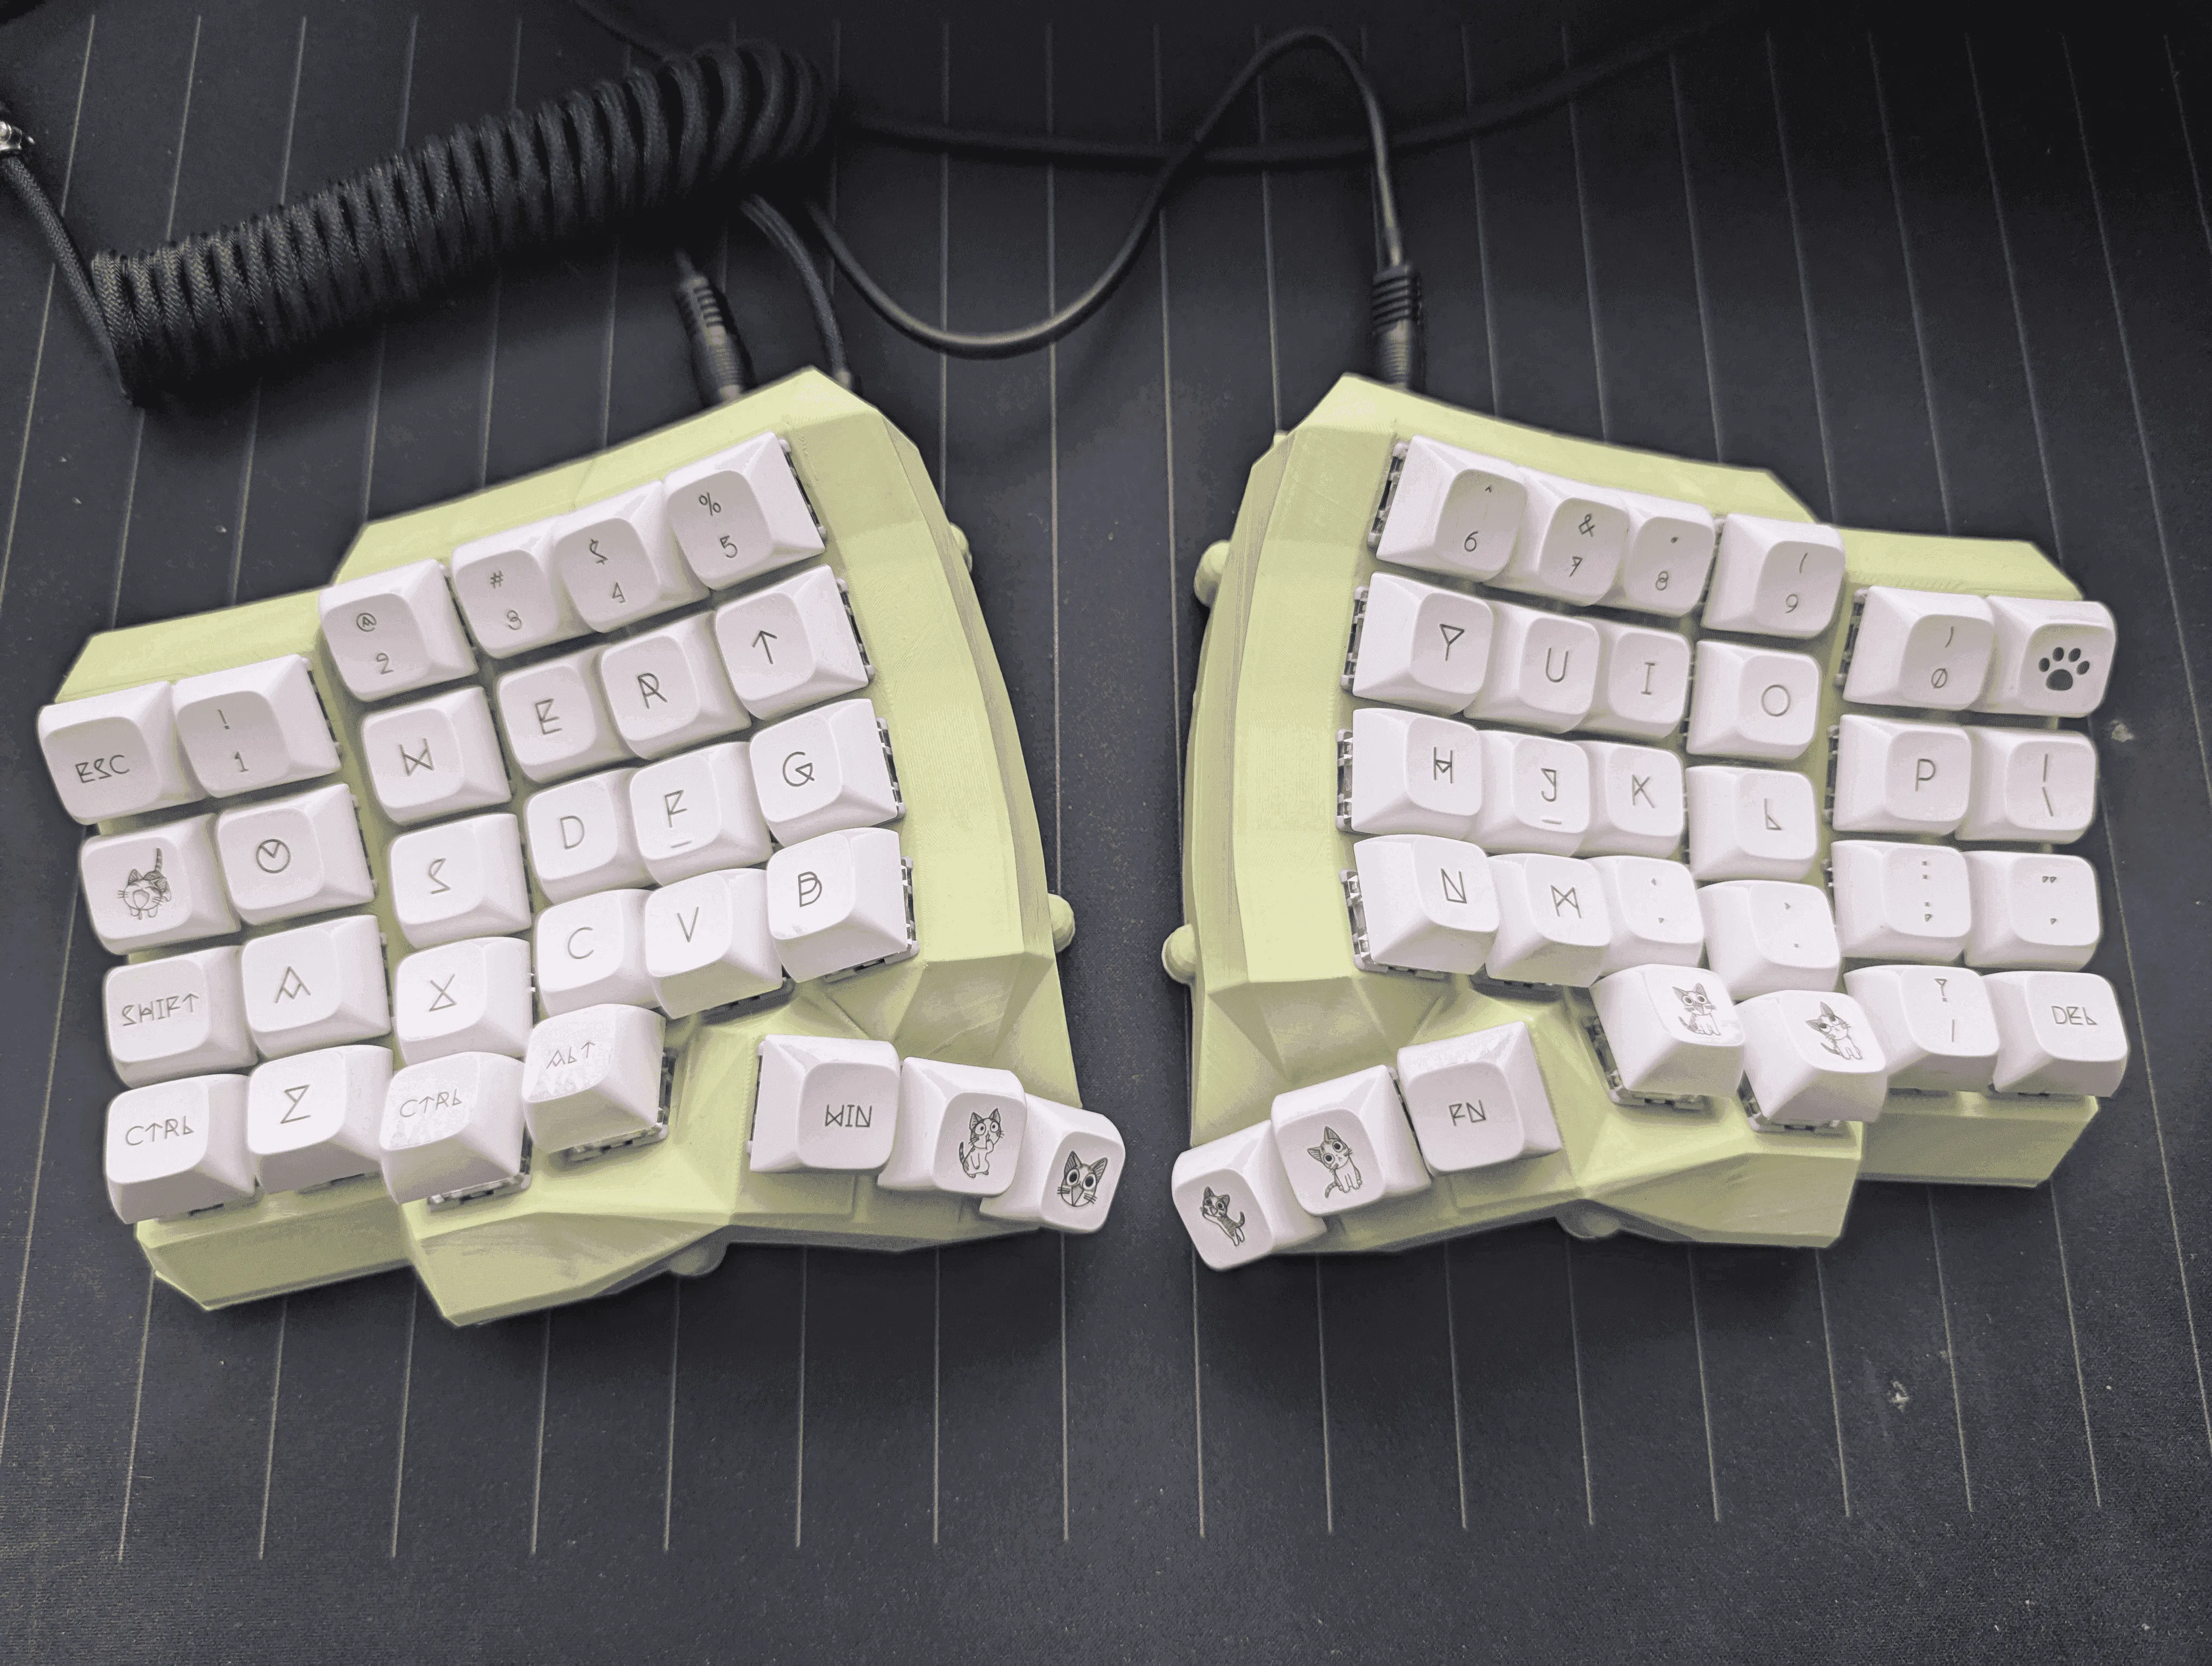
Mini Thumb Dactyl Manuform: build log and mini-review
/ 16 min read
Table of contents
TLDR
Introduction
I’ve been down the mechanical keyboard rabbit hole for a good while now. It started the way it always does — cheap gear from China with clicky switches so loud the neighbors’ windows rattled. Then came custom 80% boards (and, along the way, actually understanding what all those percentages mean), then 60%1 boards, soldering, custom kits, custom keycaps…
It’s very easy to fall headfirst into this rabbit hole, because the choice is huge, especially these days. Manufacturers finally started making 60% boards with dedicated arrow keys more often (Nuphy — my heroes), tons of low-profile keyboards showed up, and best of all — they stopped costing an arm and a leg!
But at some point you slide into a niche within a niche, an underground within the underground. Every now and then on YouTube you stumble across folks gliding hypnotically over something very strange and outrageously expensive. And that, my dears, is how I arrived at split keyboards.
The first thing I did was order a solder-it-yourself kit off AliExpress, especially since I’d long wanted to build something like that. That kit turned out to be the Sofle V2.
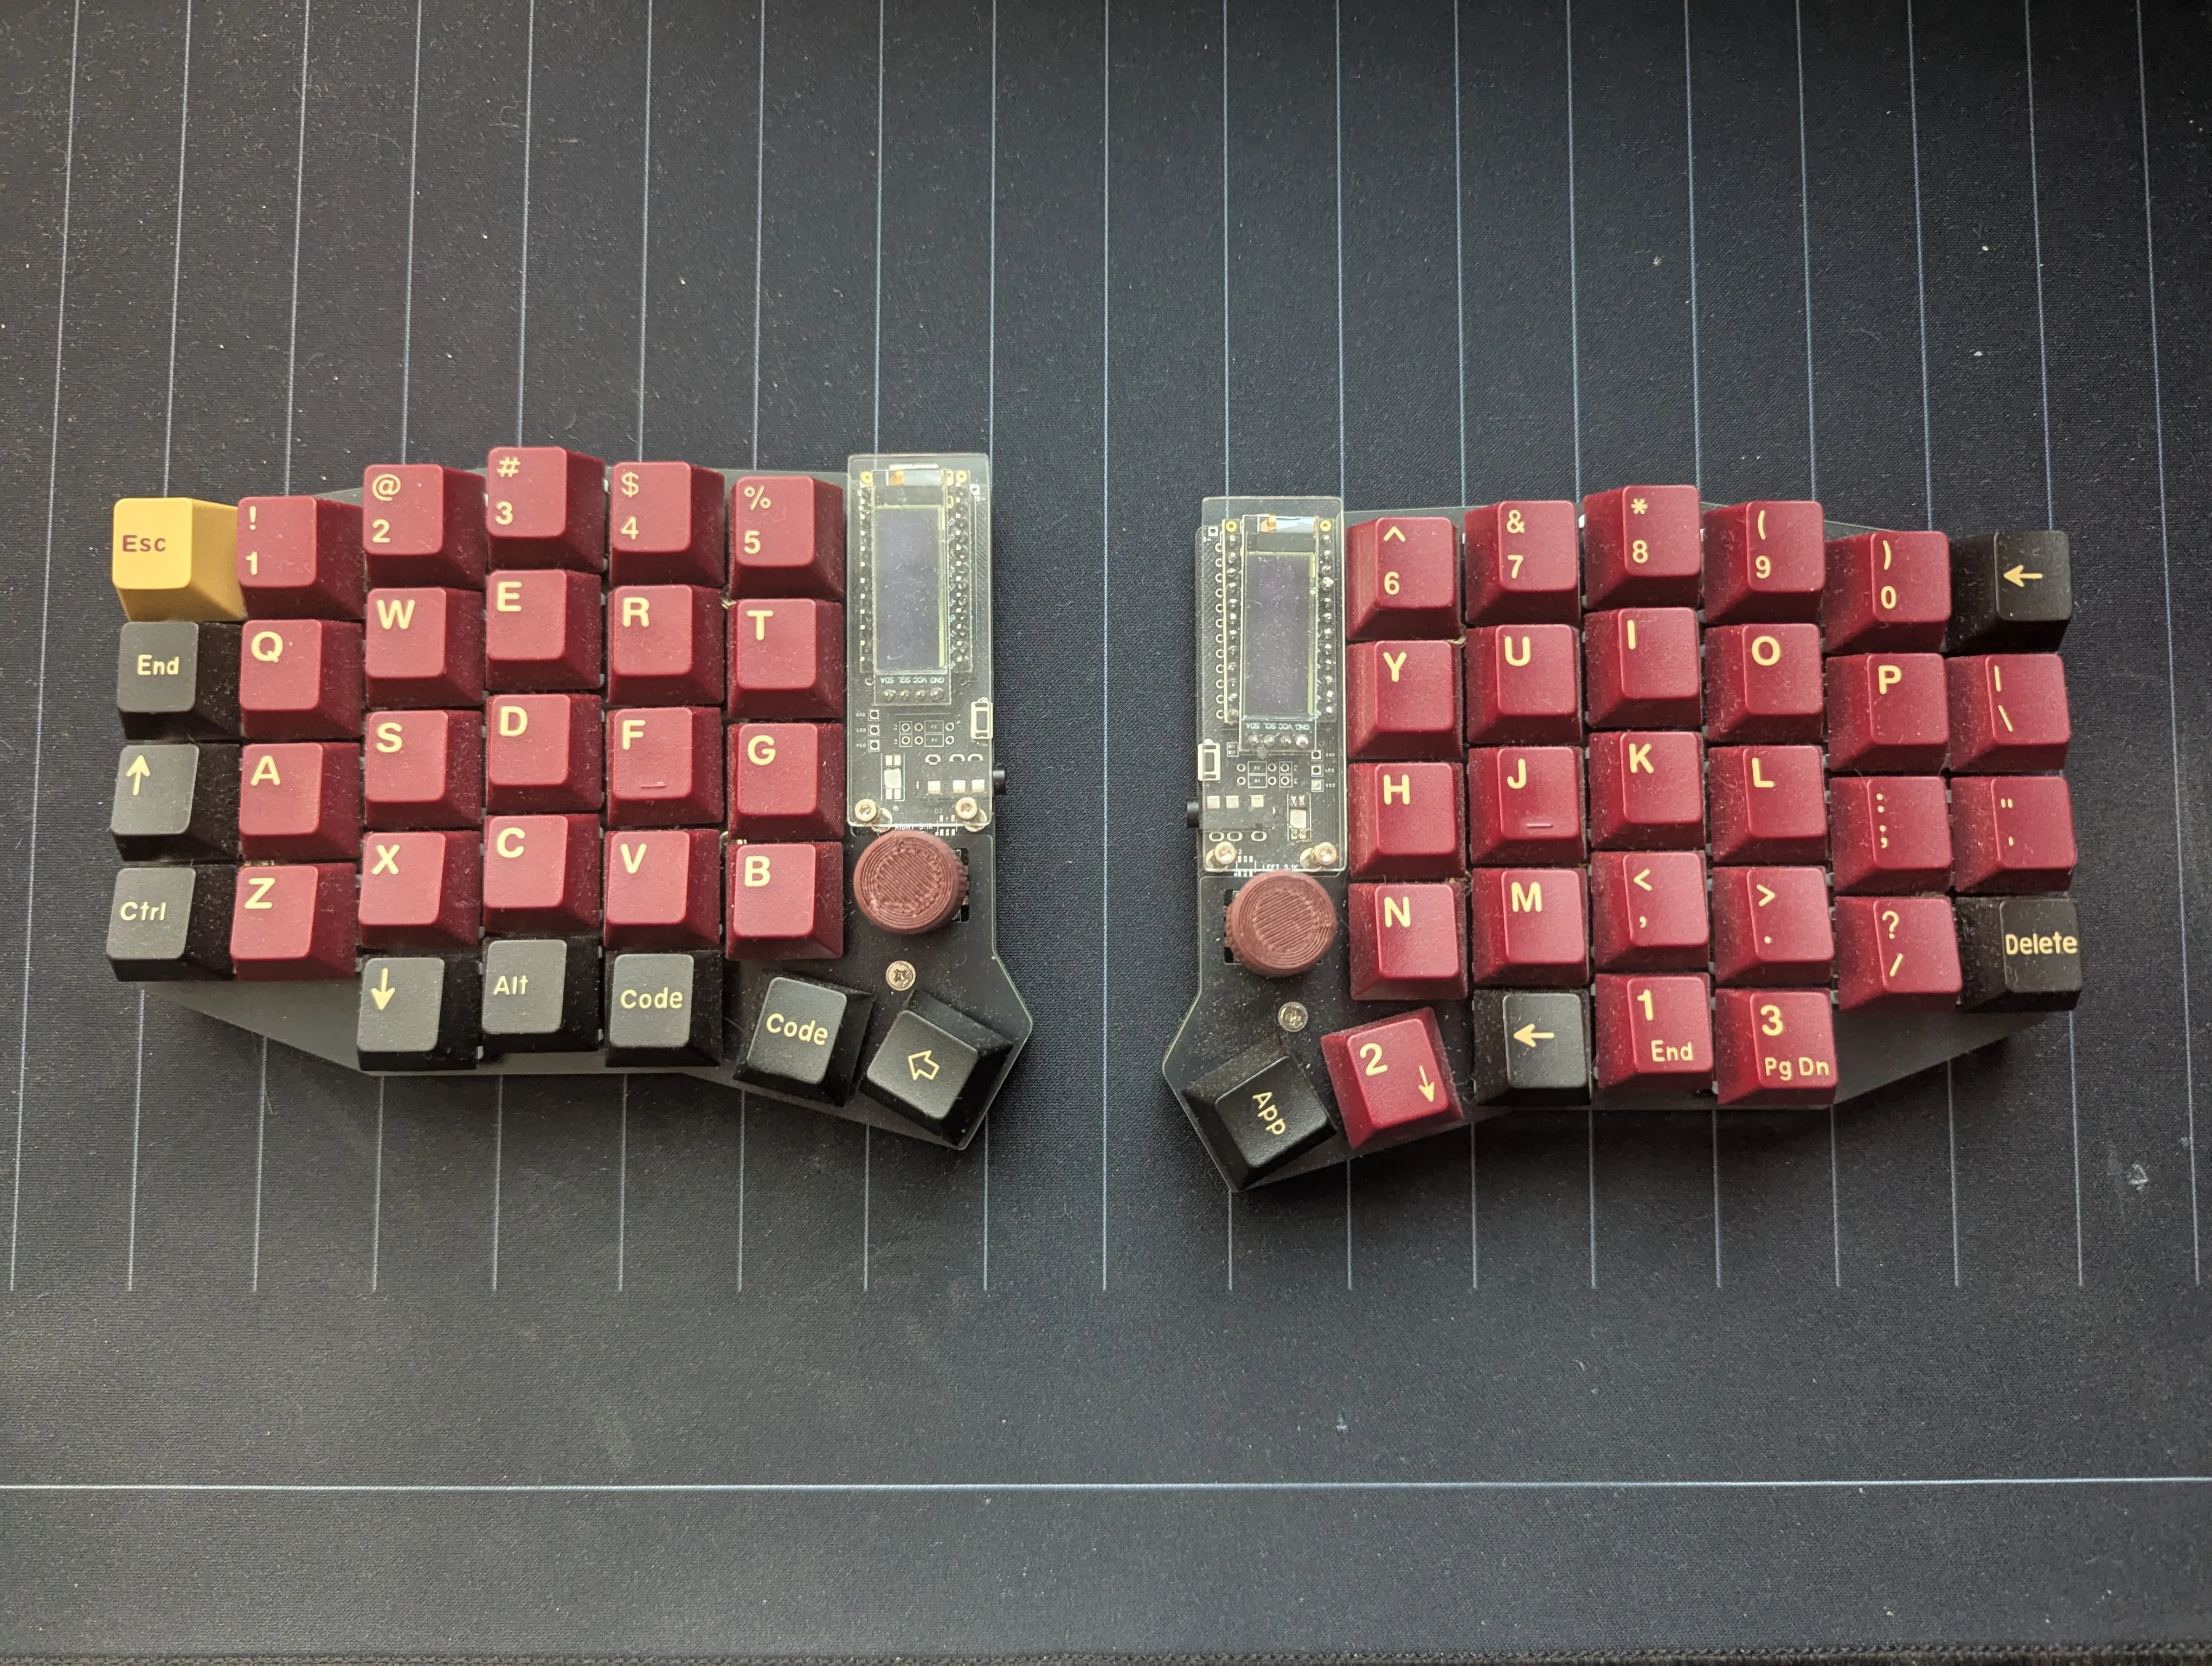
Great keyboard. Its only downside for me was its thickness — I wanted something small enough to bring to the office or take on trips. Because once you’ve retrained yourself to touch-type, especially when you can position each half of the keyboard however you like, you start craving something special. And that’s how I got into designing and building my own keyboard — Volucris.
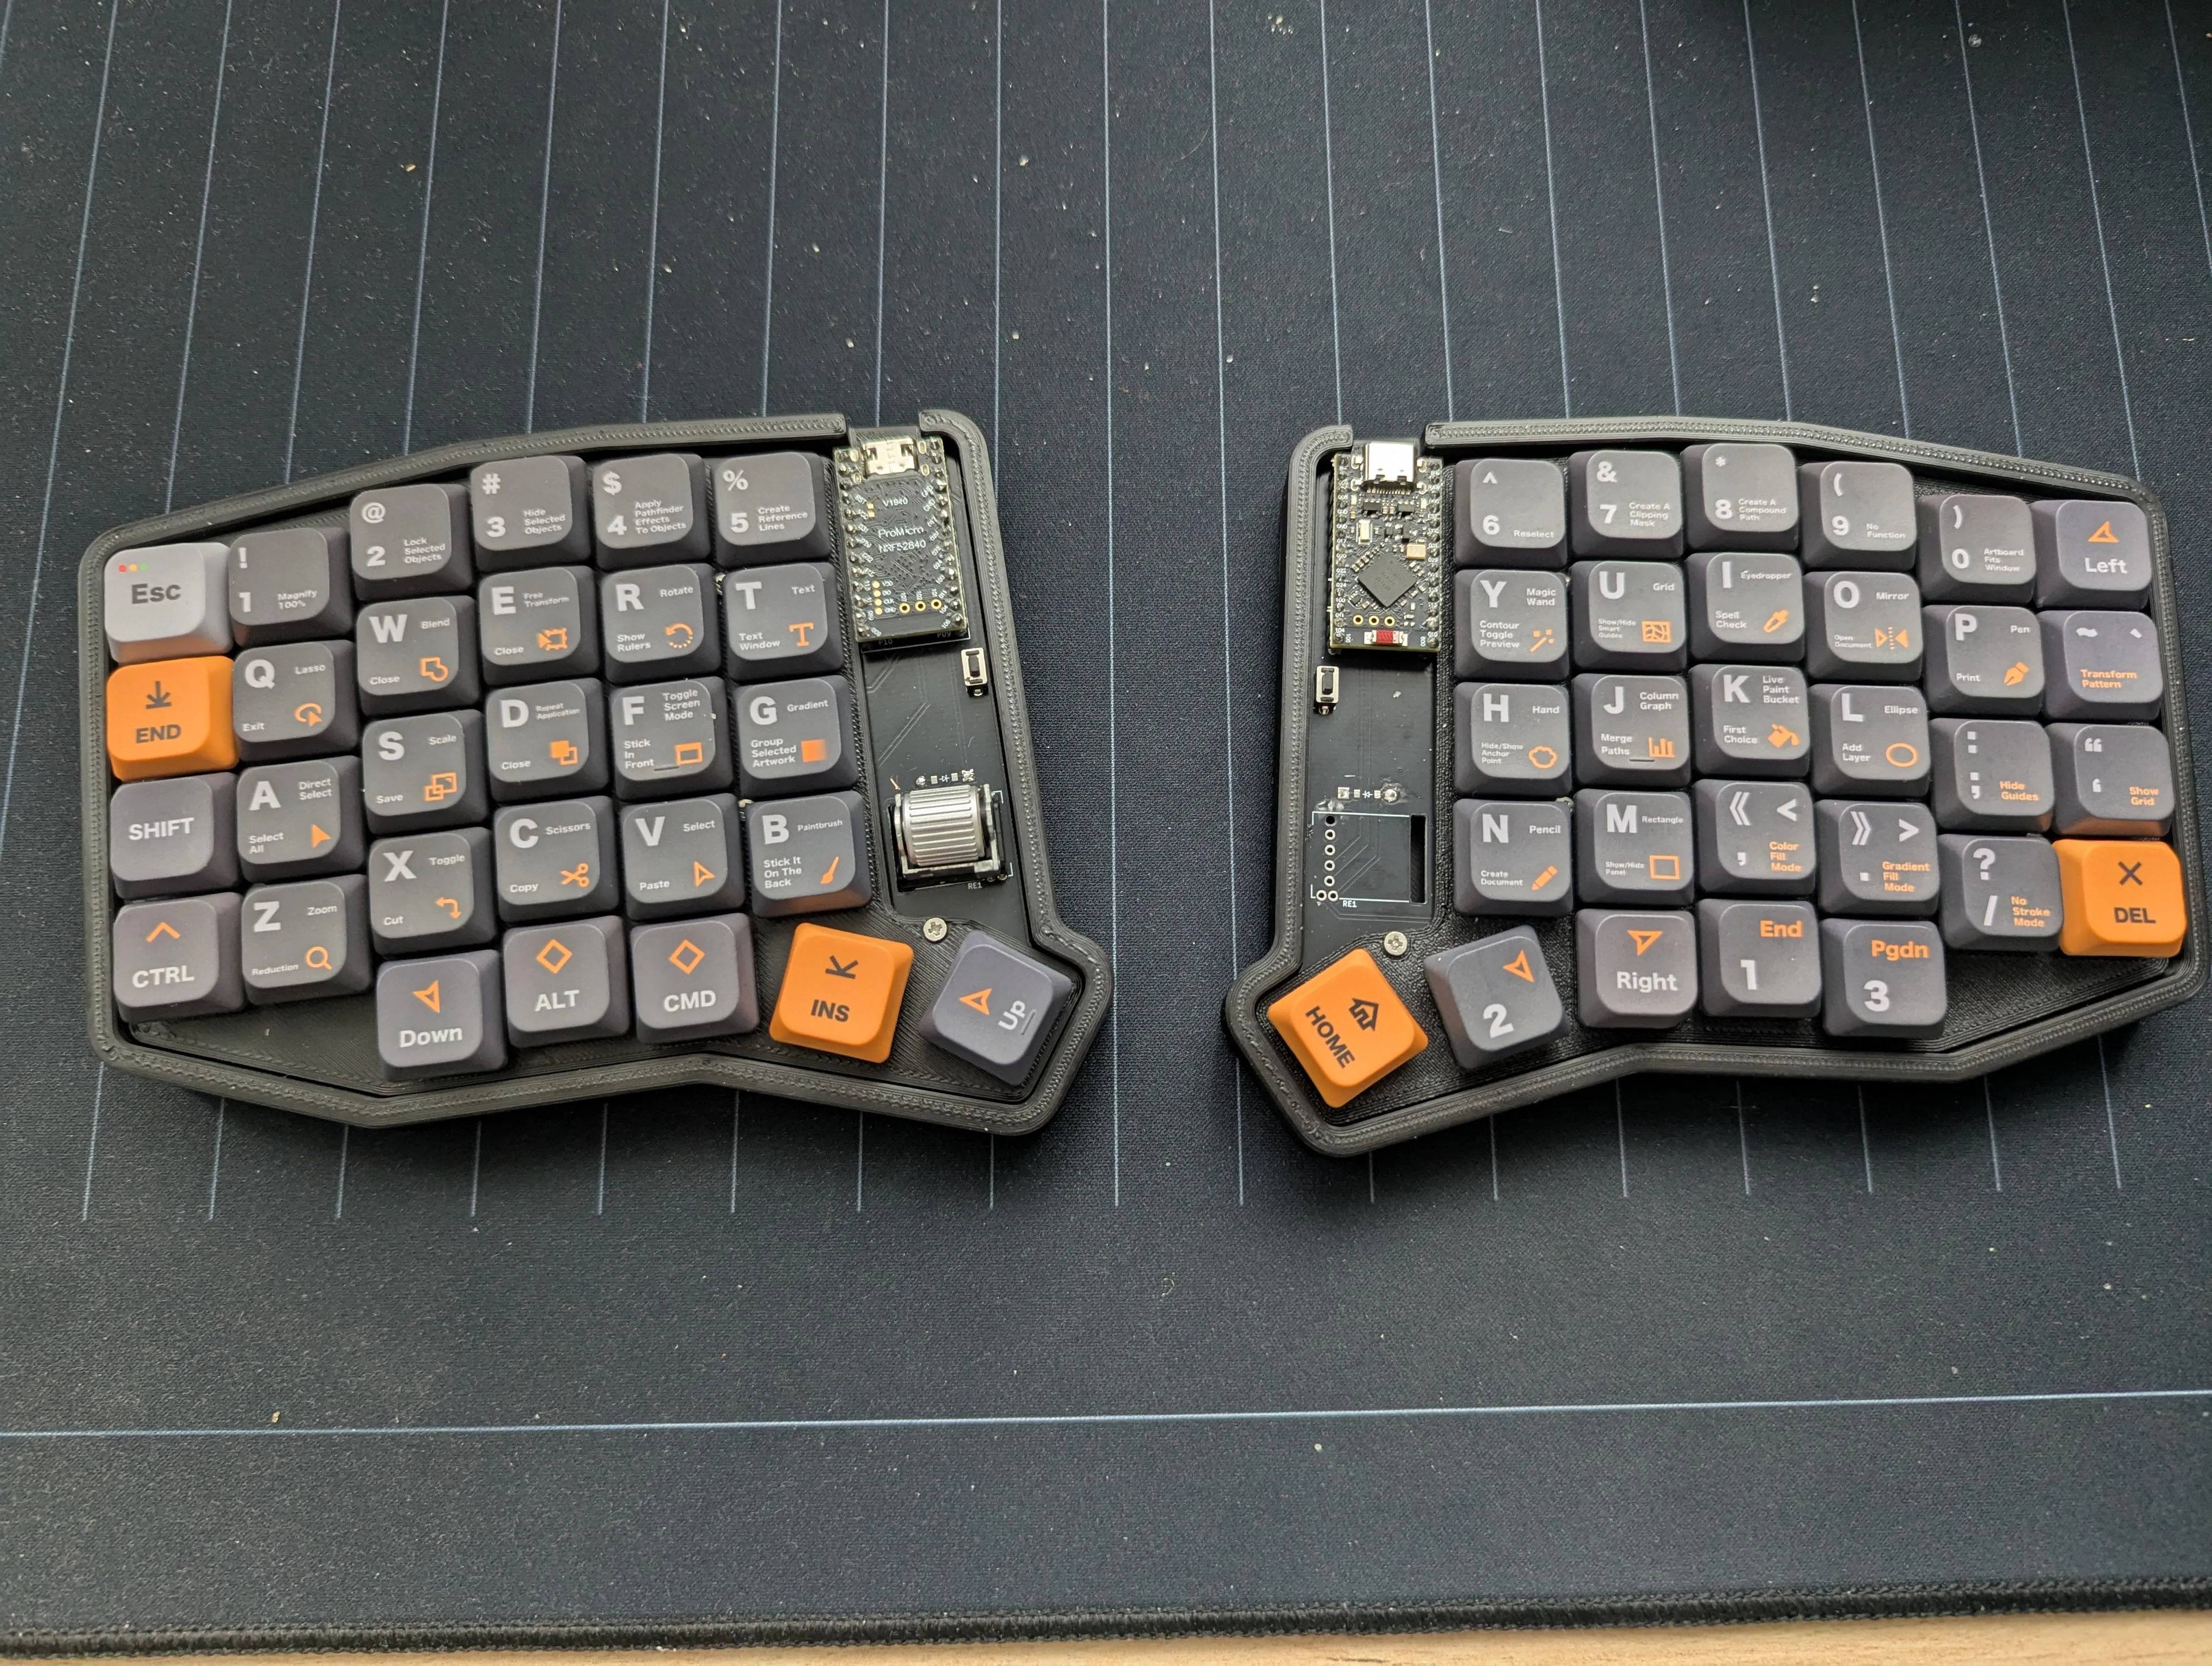
The keyboard was designed completely from scratch, from the PCB to the case. But plenty of rough edges remained, and honestly its development is still ongoing as I keep using it.
I didn’t really have any rational reason to start building a Dactyl. I just thought it’d be fun to kick off a new project, with a decent pile of spare parts on hand: I had switches, I had a spare set of keycaps I really wanted to put to use somewhere, and the 3D printer was waiting its turn.
And so, after a bit of searching, I settled on the Dactyl Manuform — or, more precisely, one of its variants, the Mini Thumb.
What is this thing

The Dactyl Manuform is a fairly well-known fork of an older keyboard, the Dactyl.
It’s:
- Parametric2 — the project repo has everything you need to tweak it to your own liking, but on top of that
-
Split — each hand gets its own half, so you can lay everything out on your desk more ergonomically
-
Concave — this is also there to improve ergonomics: your fingers have to travel less to reach certain keys
-
Columnar — unlike classic keyboards, the columns here aren’t staggered at all; instead they’re arranged so your fingers can find the right keys more easily and quickly
The project has a pretty big community; the Awesome Dactyl repo in particular helped me a lot. There are examples and guides for almost every build variant. Since I’ve been on the Sofle for a while, I tried to pick a variant with the same layout (or at least as close to it as possible).
I went with the Mini Thumb.

The build
At first the plan was simple:
-
Download the 3D models and print them
-
Hand-solder the switches and diodes
-
Wire it all up to the microcontroller board and the AUX jack
-
Flash it
-
…
-
PROFIT
But it all turned out to be not quite that simple.
Printing
You can find the models both on Printables and in the repository itself3.
There’s barely anything to print, really — just 2 parts per half. But, man, the supports. It probably also took extra fiddling because I decided to set the layer height not to the usual 0.2 mm but to 0.12, to make the surface nicer to the touch.
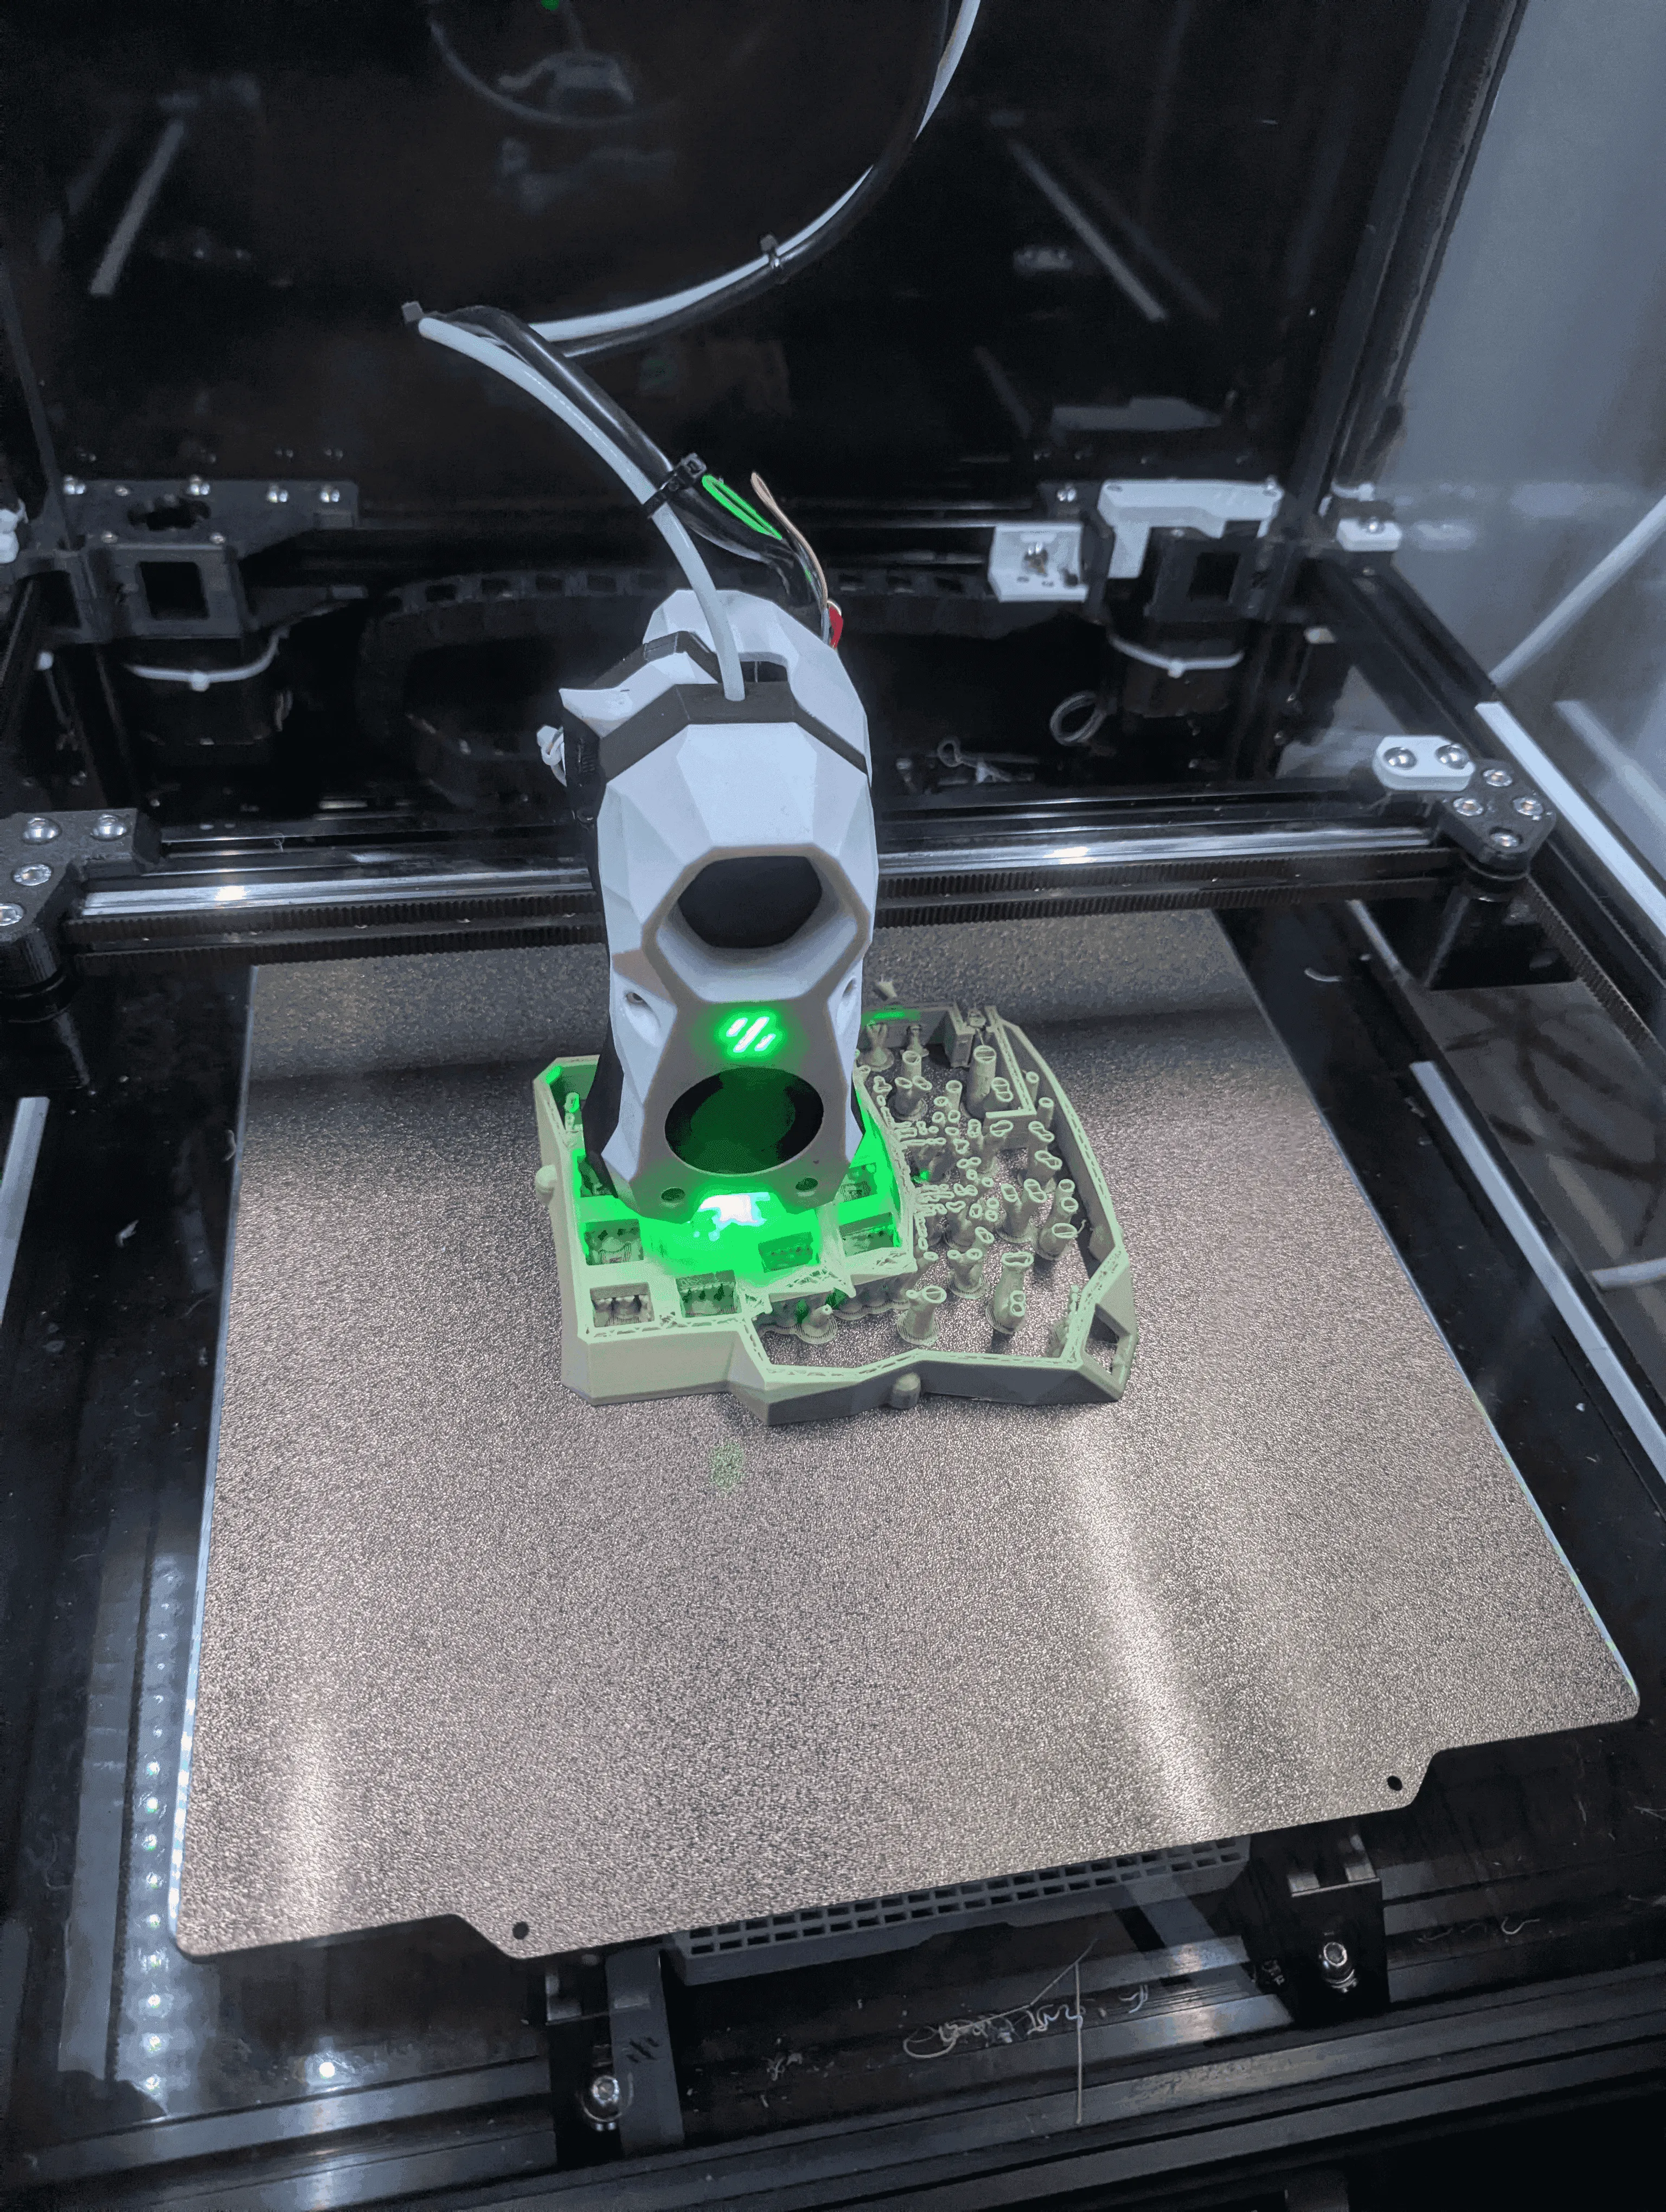
Looking back, I’d recommend not torturing yourself and just sticking with the classic 0.2, or even bumping the layer height up to 0.3. Somewhere in a few reviews I saw people print it that way and then paint/prime it. Honestly, I don’t see much point in that beyond looks and aesthetics, since the keyboard itself isn’t meant to come into contact with the case all that often.
And the supports, of course — no getting around them. All the models are already oriented correctly for the slicer (though who’s stopping you from angling everything and cranking the support count up to absurd levels). Before printing the case, do your best to tune the supports for this type of plastic, because you’ll have a lot of them to remove and it’ll take a while. And if you’re the lucky owner of an IDEX or, even better, a multi-head 3D printer, then it won’t be any trouble at all.
Soldering
Everything went off-plan right from the start.
First off, I never managed to figure out the documentation, so I ended up improvising on the fly how the switches were supposed to connect to each other.
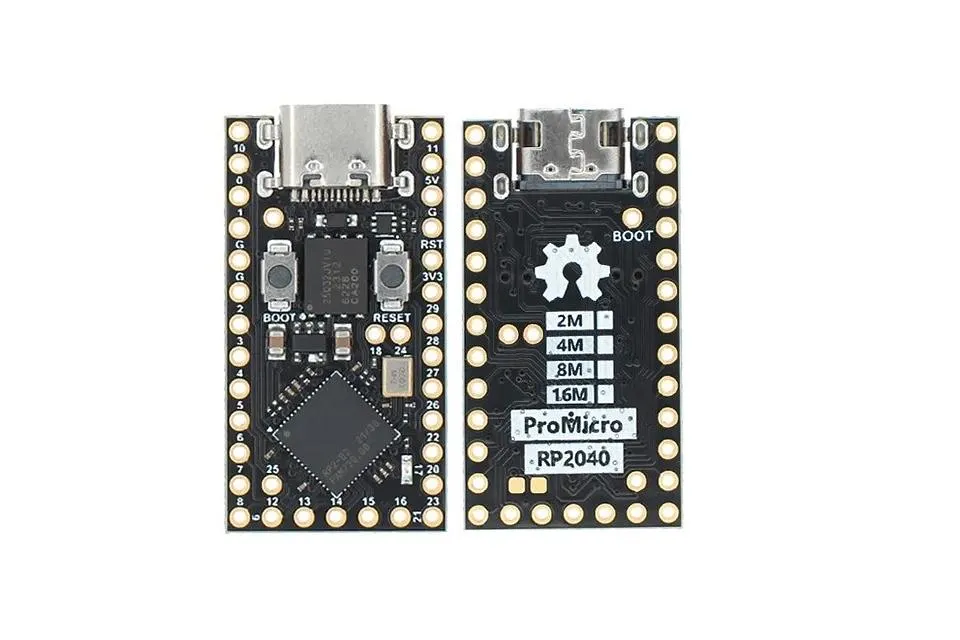
Second, the only boards I had on hand were no-name rp2040 boards, and I was sure they’d be identical in pinout and everything else to the Pro Micro boards I was used to. Oh, how wrong I was.
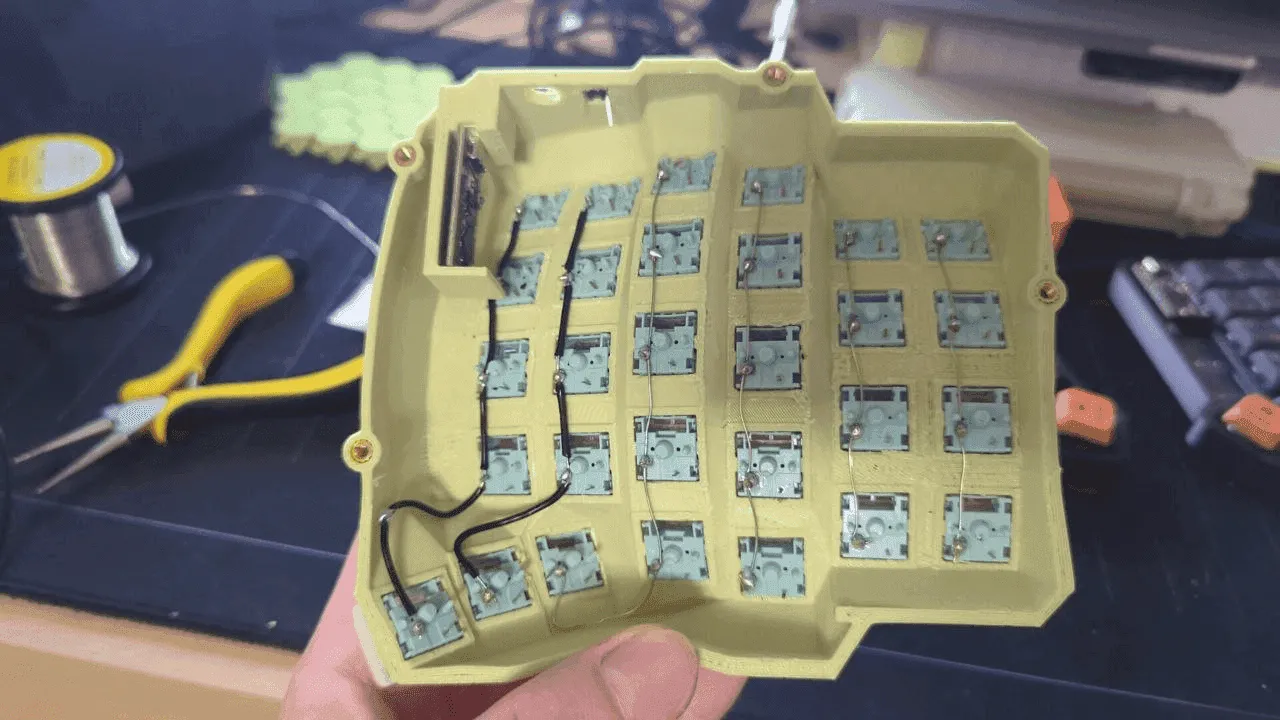
As you can see in the photo above, I started by connecting the columns. And it all seems simple enough, but for some reason I decided I needed to tack an extra switch onto column 3. That caused problems with two more columns, and later I had to cut all of it apart and re-solder. But that still won’t bring back the hours of debugging.
From there it went smoothly — solder the diodes, keeping their polarity in mind, and connect the diodes to each other with wire. Along the way, don’t forget to insulate the column wires from the row wires using heat-shrink tubing / electrical tape / a wing and a prayer.
Next up was hooking all of it to the microcontroller board. I had a couple of no-name rp2040 boards at my disposal, something like these:
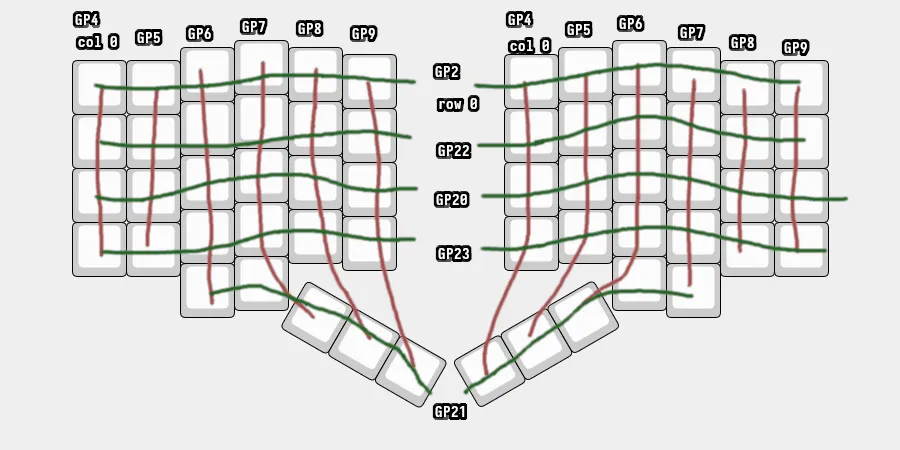
The docs included a schematic that all the other changes were based on, but in the end the keyboard came out more like this.
Final schematic
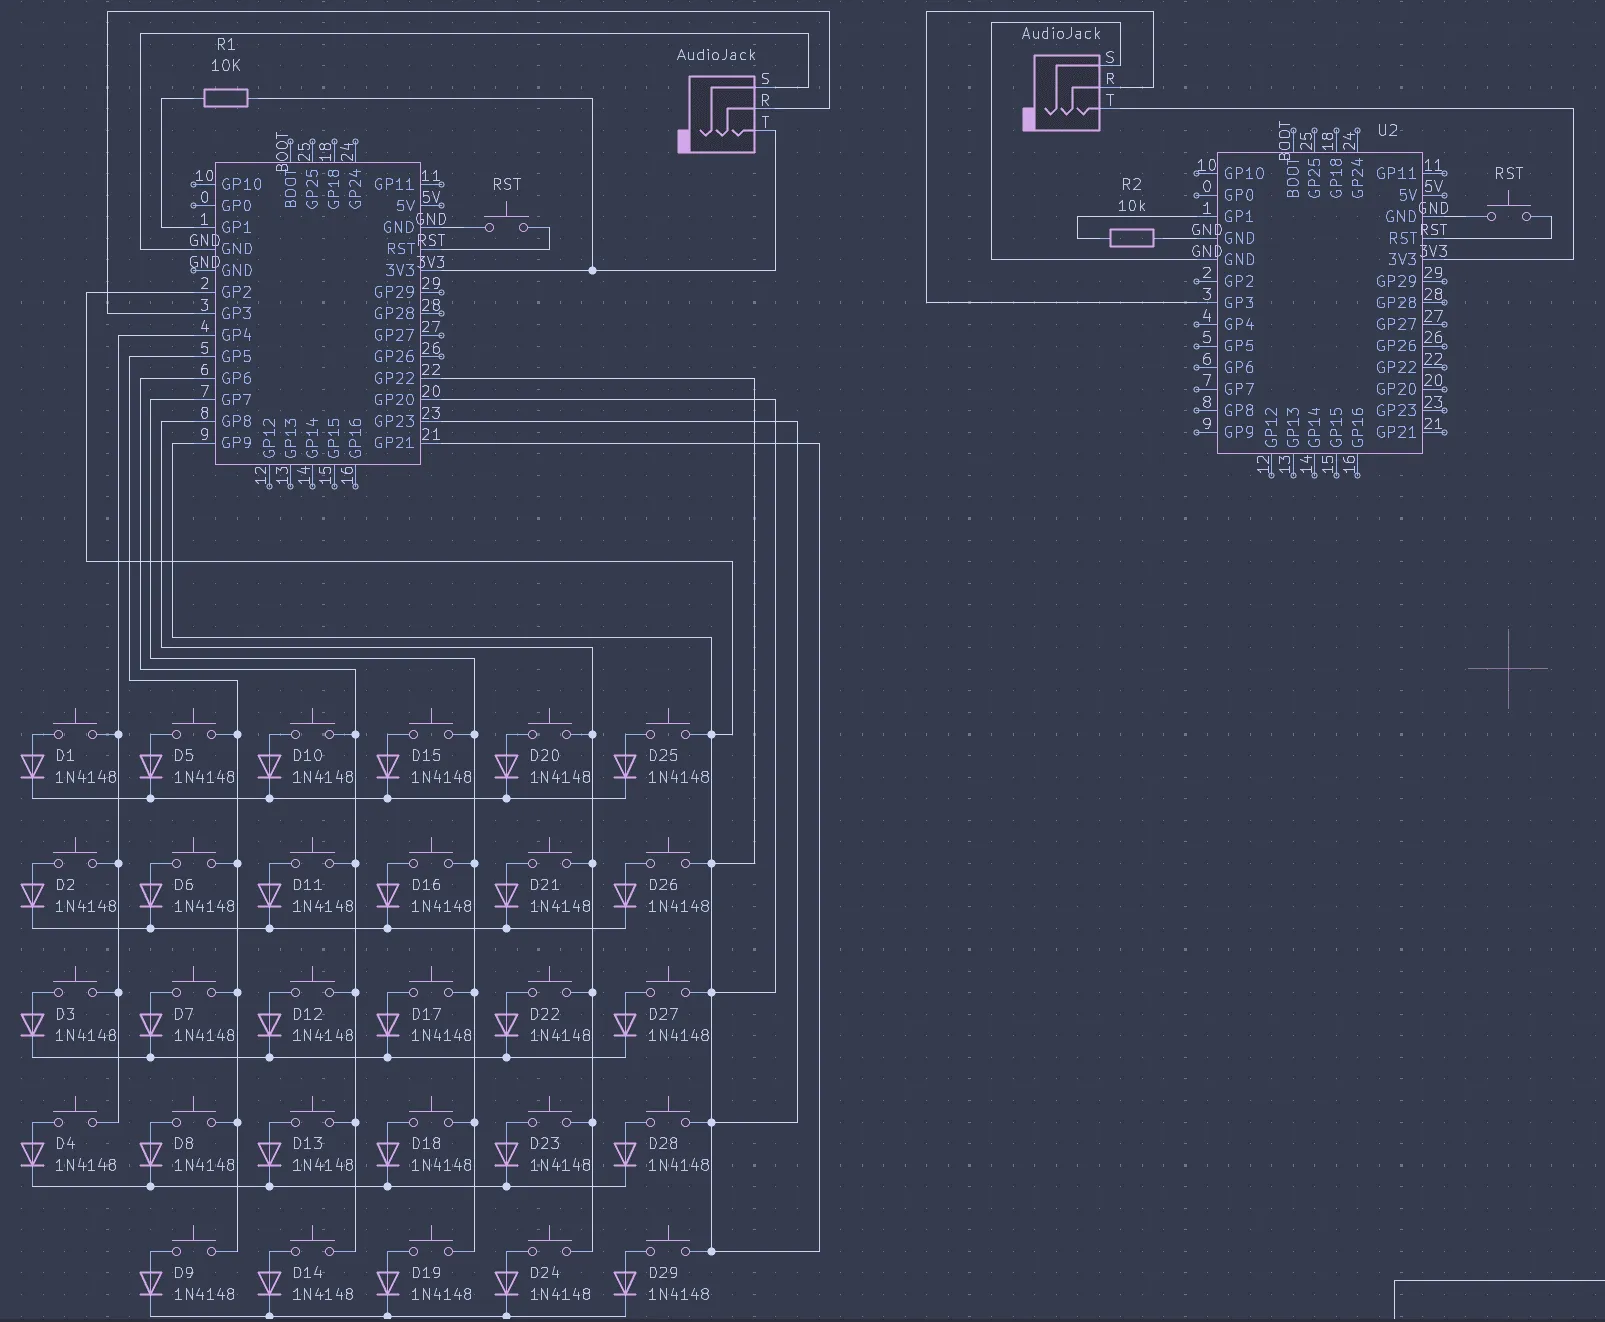
For simplicity, here’s the schematic showing how the rows/columns connect to the microcontroller board in each half:
And here’s what it looks like in my case:
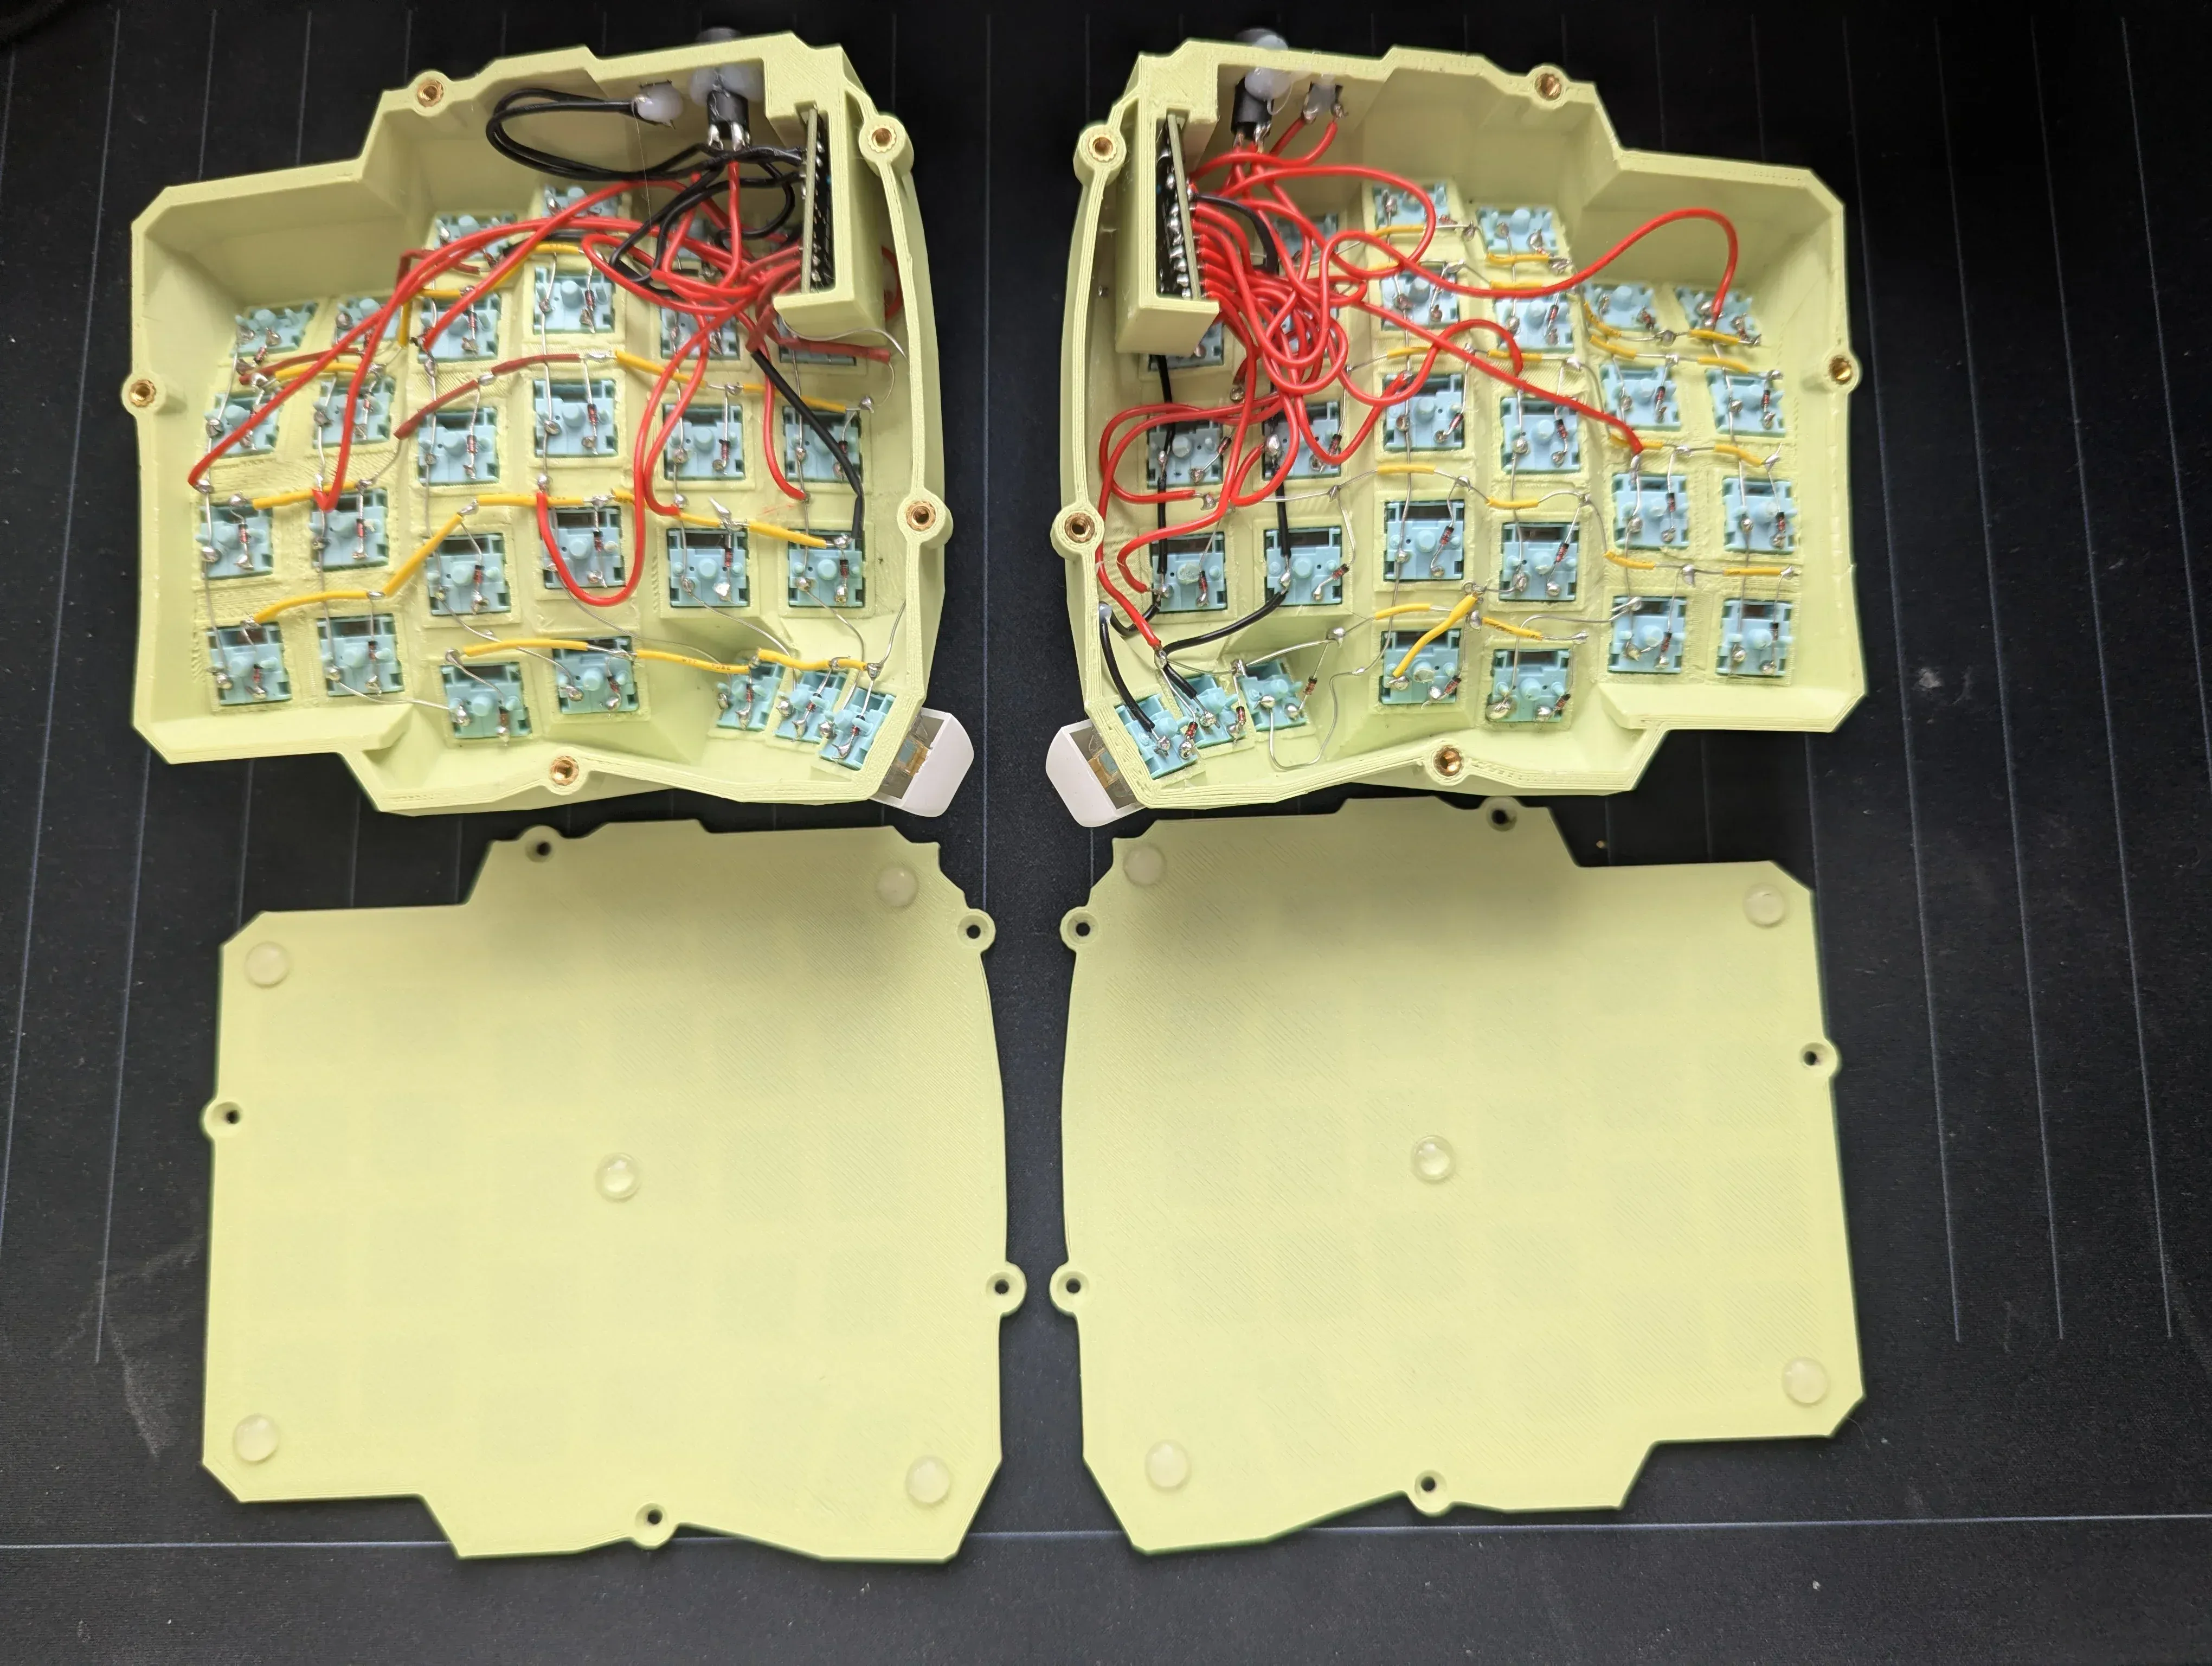
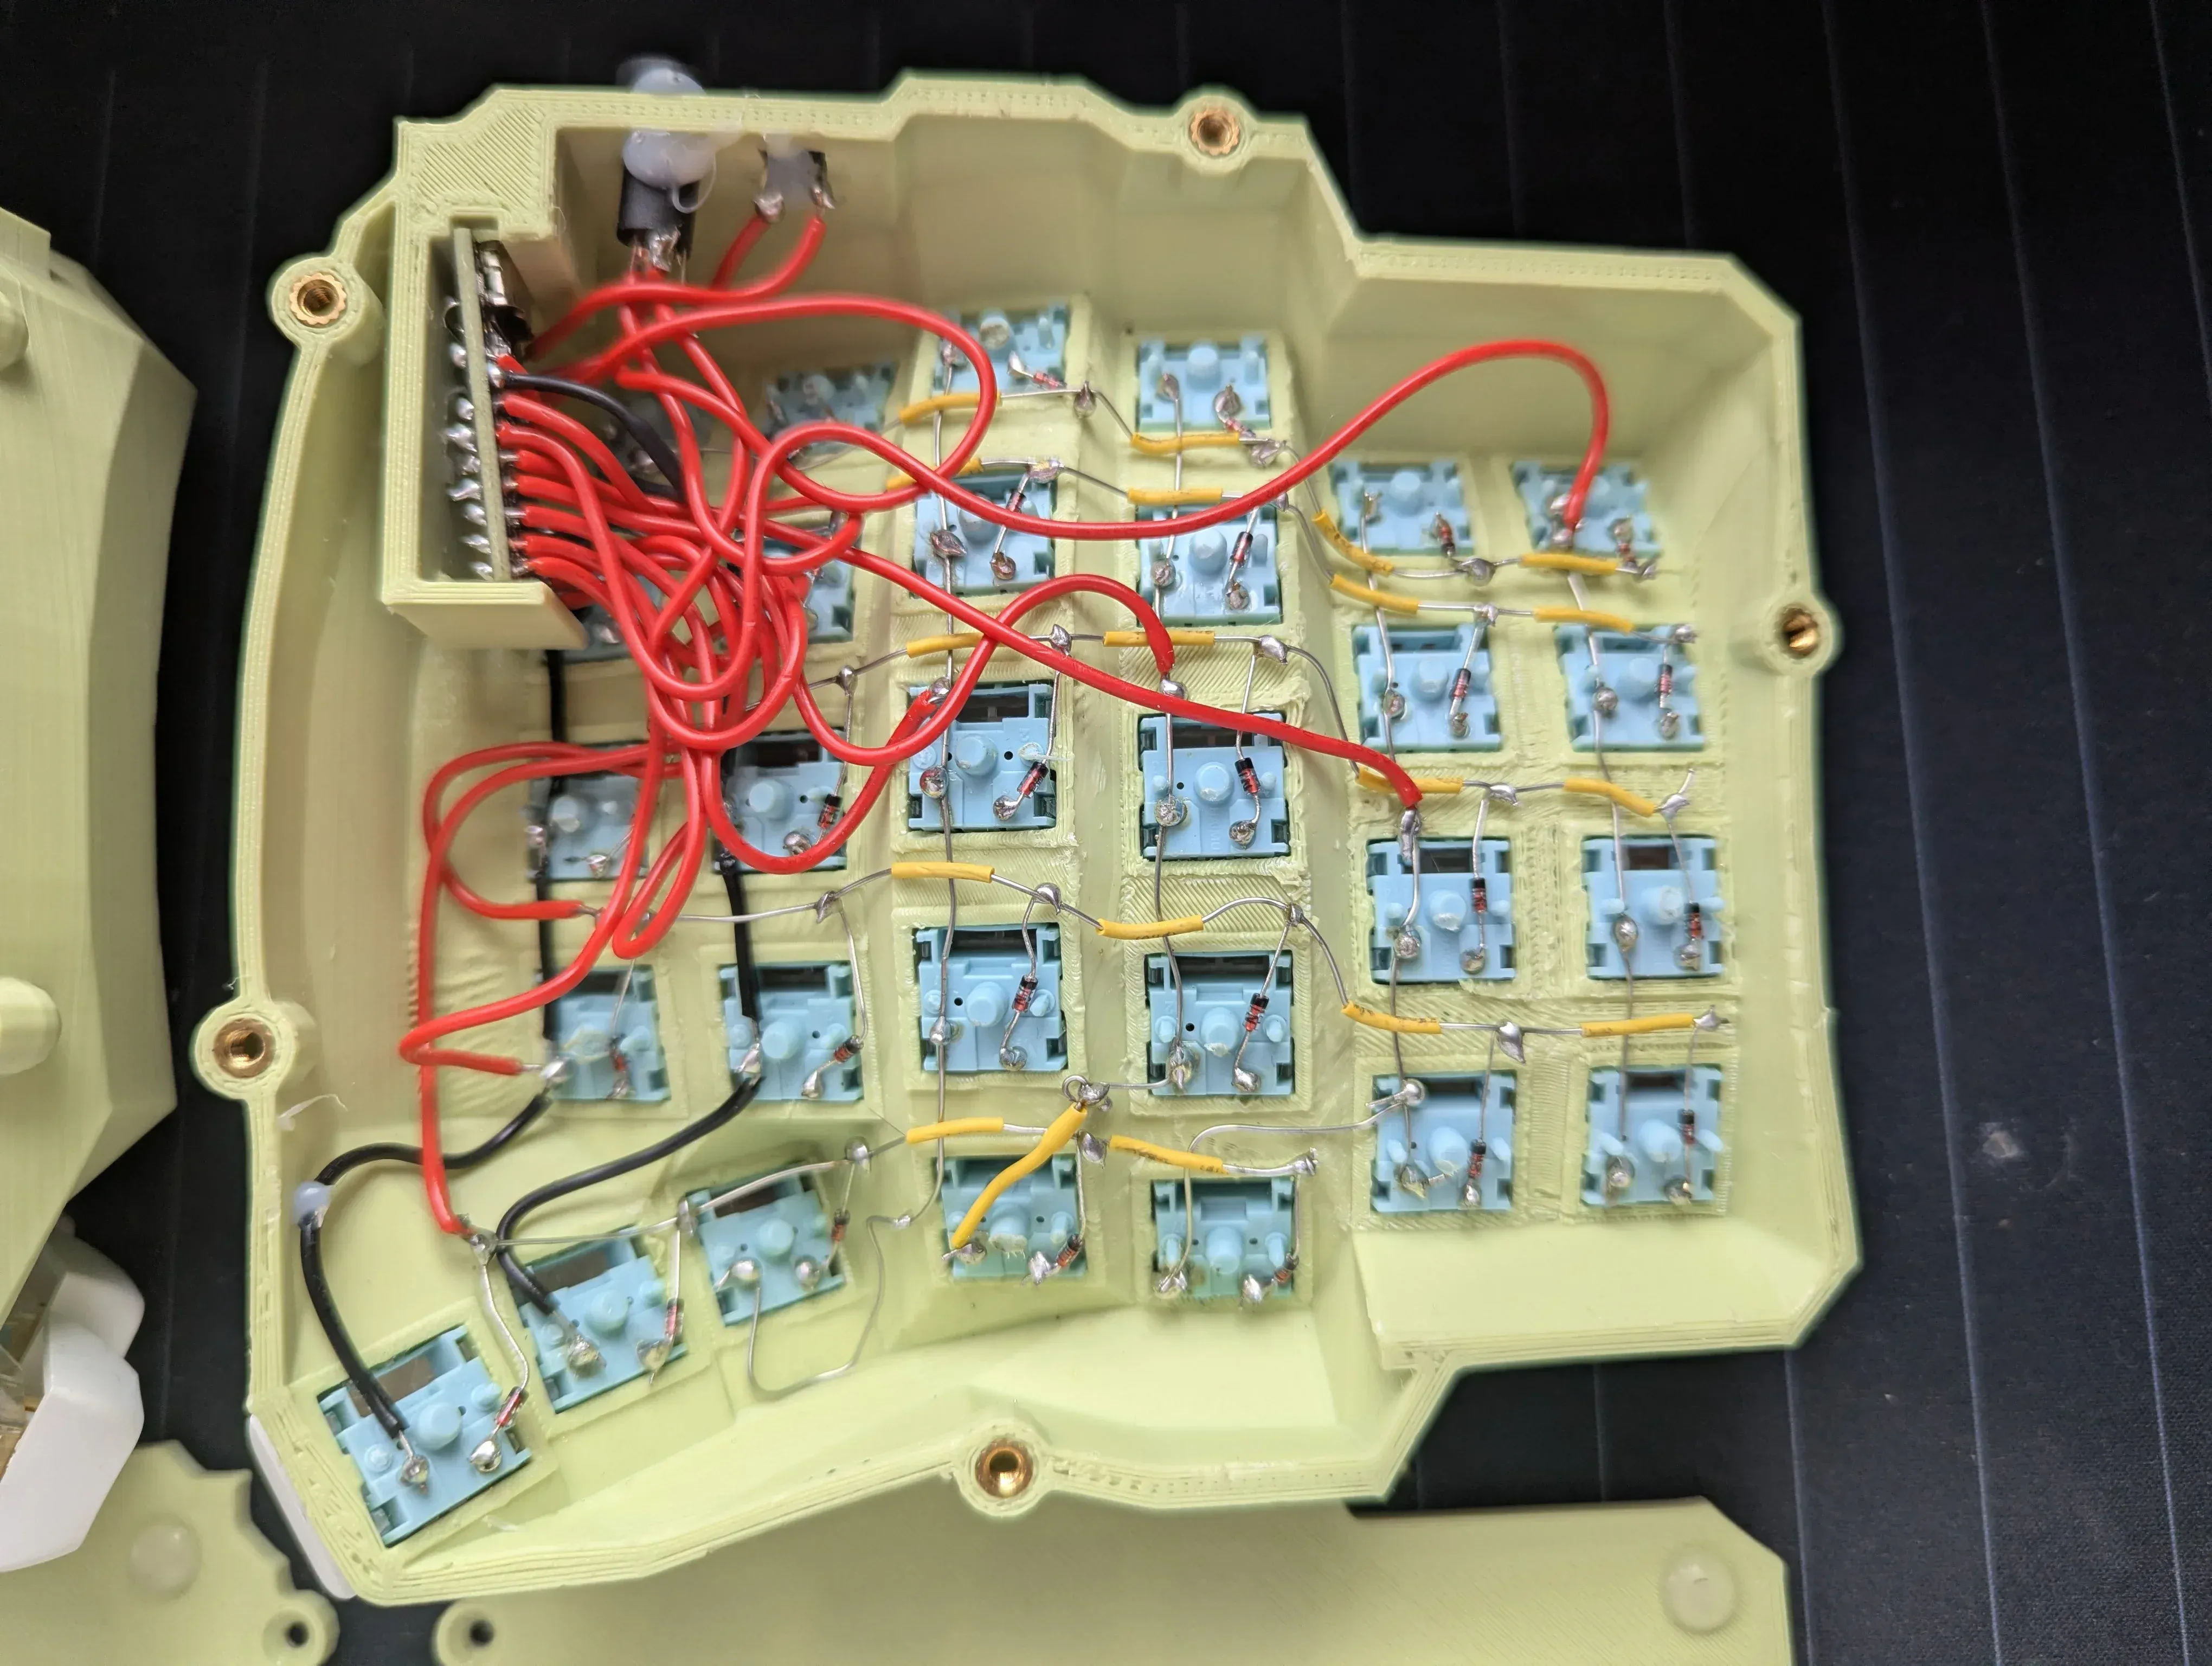
So if you’re worried about it looking ugly or unrefined — don’t be, at least it works)
The keyboard was always meant to be a home board, permanently wired in. So the choice clearly fell on QMK. And this is exactly where the main catch showed up.
At the time of writing, the current version of QMK is 1.2.0, whereas the fork the mini-thumb author provided was made about 5 years ago, and nothing worked for me at all. Without a better idea, we start building our own.
Custom config
I honestly hadn’t touched QMK in a very long time. The last time was about 3 years ago, when I really wanted my own cute little macropad. It’s still lying around somewhere far away, because I never did manage to fit it into my workflow.
And so everything was done pretty much from scratch.
What does a QMK config even look like? It’s a giant folder cataloging hundreds of different layout and keyboard variations for every taste.
There are like 10 Dactyls alone.
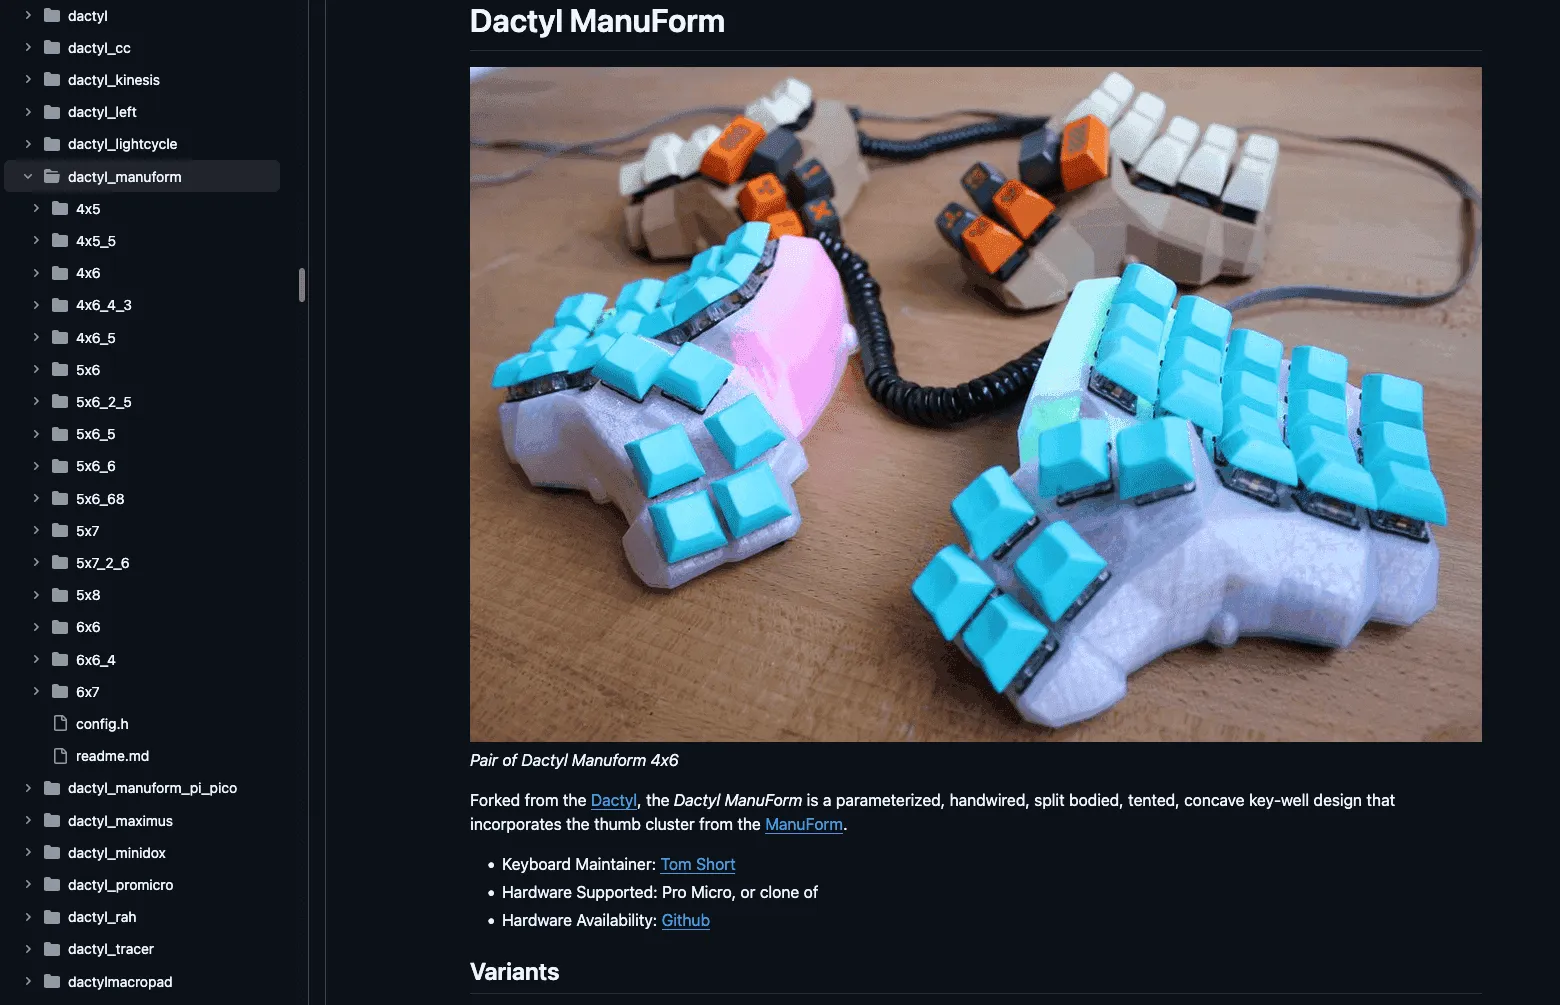
In places it honestly feels like a graveyard — some kind soul put together a config, attached screenshots, wrote documentation. But because of the relentless march of time, backward-compatibility-breaking updates, and the plain low popularity of certain builds, there’s just nothing you can do with these configs. Maybe somewhere there is, or was, a migration script, but it clearly hasn’t been run on many of the Dactyl variants.
I decided to use handwired/dactyl_manuform/5x6 as the base. Because overall it best matched the description of what I needed, and it had a config that at least tried to compile on the current version of QMK.
First, we strip out every mention of the backlight — I wasn’t planning to add one, so we just rip it out:
"rgblight": { "led_count": 12 }, "ws2812": { "pin": "D3" },The first attempt was straightforward — swap the chip, since this one was under atmega32u4 too:
"processor": "atmega32u4", "bootloader": "caterina", "processor": "RP2040", "bootloader": "rp2040",Okay, so something tries to build but falls over, because the pin names are wrong. Well then, off to the docs.
Alright, we sorted out the chip’s pins, let’s change them:
"matrix_pins": { "cols": ["D4", "C6", "D7", "E6", "B4", "B5"], "rows": ["F6", "F7", "B1", "B3", "B2", "B6"] "rows": ["GP2", "GP22", "GP20", "GP23", "GP21"], "cols": ["GP4", "GP5", "GP6", "GP7", "GP8", "GP9"] }, "split": { "enabled": true, "serial": { "pin": "D0" "pin": "GP3" } },It compiled, but won’t flash, even though everything’s correct. Okay, more googling. Turns out you need to specify some other driver to get it going. Good, "driver": "vendor" did the trick.
And we’re still skipping everything to do with dialing in the right values for the "layouts" object, setting up keymaps.c, and the headache around the GP26 pin.
GP26
The schematic says to pick pins 12 and up for the columns, and 13 and up for the rows. So that’s what I did, but in the end the top row, where the numbers usually are, registered the entire column being pressed whenever I hit any key. So basically, by the time I’d already fixed every quirk — this one was still hanging around. I ruled out shorts and re-soldered the diodes several times over.
And then, once it became clear the problem was a specific pin, I started reading up on what could be wrong with it.
Turns out that on rp2040 chips, pins GP26, GP27, GP28, and GP29 are ADC pins, meaning they don’t guarantee proper operation as a regular GPIO pin. And the moment I moved the whole row over to GP2, everything worked exactly as it should.
Final config
{  "keyboard_name": "Dactyl-Manuform (5x6)",  "manufacturer": "tshort",  "maintainer": "qmk",  "usb": {    "vid": "0x444D",    "pid": "0x3536",    "device_version": "0.0.1"  },  "features": {    "bootmagic": false,    "command": true,    "extrakey": true,    "mousekey": true,    "nkro": false  },  "qmk": {    "locking": {      "enabled": true,      "resync": true    }  },  "matrix_pins": {    "rows": ["GP2", "GP22", "GP20", "GP23", "GP21"],    "cols": ["GP4", "GP5", "GP6", "GP7", "GP8", "GP9"]  },  "diode_direction": "COL2ROW",  "split": {    "enabled": true,    "serial": {      "pin": "GP3",      "driver": "vendor"    }  },  "processor": "RP2040",  "bootloader": "rp2040",  "layouts": {    "LAYOUT_5x6": {      "layout": [        {"matrix": [0, 0], "x": 0, "y": 0},        {"matrix": [0, 1], "x": 1, "y": 0},        {"matrix": [0, 2], "x": 2, "y": 0},        {"matrix": [0, 3], "x": 3, "y": 0},        {"matrix": [0, 4], "x": 4, "y": 0},        {"matrix": [0, 5], "x": 5, "y": 0},
        {"matrix": [5, 0], "x": 9, "y": 0},        {"matrix": [5, 1], "x": 10, "y": 0},        {"matrix": [5, 2], "x": 11, "y": 0},        {"matrix": [5, 3], "x": 12, "y": 0},        {"matrix": [5, 4], "x": 13, "y": 0},        {"matrix": [5, 5], "x": 14, "y": 0},
        {"matrix": [1, 0], "x": 0, "y": 1},        {"matrix": [1, 1], "x": 1, "y": 1},        {"matrix": [1, 2], "x": 2, "y": 1},        {"matrix": [1, 3], "x": 3, "y": 1},        {"matrix": [1, 4], "x": 4, "y": 1},        {"matrix": [1, 5], "x": 5, "y": 1},
        {"matrix": [6, 0], "x": 9, "y": 1},        {"matrix": [6, 1], "x": 10, "y": 1},        {"matrix": [6, 2], "x": 11, "y": 1},        {"matrix": [6, 3], "x": 12, "y": 1},        {"matrix": [6, 4], "x": 13, "y": 1},        {"matrix": [6, 5], "x": 14, "y": 1},
        {"matrix": [2, 0], "x": 0, "y": 2},        {"matrix": [2, 1], "x": 1, "y": 2},        {"matrix": [2, 2], "x": 2, "y": 2},        {"matrix": [2, 3], "x": 3, "y": 2},        {"matrix": [2, 4], "x": 4, "y": 2},        {"matrix": [2, 5], "x": 5, "y": 2},
        {"matrix": [7, 0], "x": 9, "y": 2},        {"matrix": [7, 1], "x": 10, "y": 2},        {"matrix": [7, 2], "x": 11, "y": 2},        {"matrix": [7, 3], "x": 12, "y": 2},        {"matrix": [7, 4], "x": 13, "y": 2},        {"matrix": [7, 5], "x": 14, "y": 2},
        {"matrix": [3, 0], "x": 0, "y": 3},        {"matrix": [3, 1], "x": 1, "y": 3},        {"matrix": [3, 2], "x": 2, "y": 3},        {"matrix": [3, 3], "x": 3, "y": 3},        {"matrix": [3, 4], "x": 4, "y": 3},        {"matrix": [3, 5], "x": 5, "y": 3},
        {"matrix": [8, 0], "x": 9, "y": 3},        {"matrix": [8, 1], "x": 10, "y": 3},        {"matrix": [8, 2], "x": 11, "y": 3},        {"matrix": [8, 3], "x": 12, "y": 3},        {"matrix": [8, 4], "x": 13, "y": 3},        {"matrix": [8, 5], "x": 14, "y": 3},
        {"matrix": [4, 1], "x": 1, "y": 4},        {"matrix": [4, 2], "x": 2, "y": 4},        {"matrix": [4, 3], "x": 3, "y": 4},        {"matrix": [4, 4], "x": 4, "y": 4},        {"matrix": [4, 5], "x": 5, "y": 4},
{"matrix": [9, 0], "x": 9, "y": 4}, {"matrix": [9, 1], "x": 9, "y": 4}, {"matrix": [9, 2], "x": 9, "y": 4}, {"matrix": [9, 3], "x": 10, "y": 4}, {"matrix": [9, 4], "x": 11, "y": 4} ] } }}#include QMK_KEYBOARD_H
#define _QWERTY 0#define _LOWER 1#define _RAISE 2
#define RAISE MO(_RAISE)#define LOWER MO(_LOWER)
const uint16_t PROGMEM keymaps[][MATRIX_ROWS][MATRIX_COLS] = { [_QWERTY] = LAYOUT_5x6( KC_ESC , KC_1 , KC_2 , KC_3 , KC_4 , KC_5 , KC_6 , KC_7 , KC_8 , KC_9 , KC_0 , KC_BSPC, KC_TAB , KC_Q , KC_W , KC_E , KC_R , KC_T , KC_Y , KC_U , KC_I , KC_O , KC_P , KC_BSLS, KC_LSFT , KC_A , KC_S , KC_D , KC_F , KC_G , KC_H , KC_J , KC_K , KC_L , KC_SCLN, KC_QUOT, KC_LCTL , KC_Z , KC_X , KC_C , KC_V , KC_B , KC_N , KC_M , KC_COMM, KC_DOT , KC_SLSH, KC_DEL , KC_LCTL, KC_LALT, KC_LGUI, KC_SPACE, KC_LSFT, KC_ENT , LOWER , RAISE , KC_4 , KC_5 ), [_LOWER] = LAYOUT_5x6( KC_GRAVE, _______, _______, _______, _______, _______ , _______, _______, _______, _______, KC_MINS, KC_EQUAL, _______ , _______, _______, _______, _______, _______ , _______, _______, KC_UP, _______, KC_LBRC, KC_RBRC , _______ , _______, _______, _______, _______, _______ , _______, KC_LEFT, KC_DOWN, KC_RGHT, _______, _______ , _______ , _______, _______, _______, _______, _______ , _______, _______, _______, _______, _______, _______ , _______, _______, _______, _______ , _______, _______, _______, _______, _______, _______ ), [_RAISE] = LAYOUT_5x6( KC_MUTE , KC_VOLD, KC_VOLU, _______, KC_BRID, KC_BRIU , _______, _______, _______, _______, _______, _______, _______ , _______, _______, MS_WHLU, _______, _______ , _______, MS_BTN1, MS_UP , MS_BTN2, MS_BTN3, _______, _______ , _______, MS_WHLL, MS_WHLD, MS_WHLR, _______ , _______, MS_LEFT, MS_DOWN, MS_RGHT, _______, _______, _______ , _______, _______, _______, _______, _______ , _______, _______, _______, _______, _______, _______, _______, _______, _______, _______ , _______, _______, _______, _______, _______, _______ ),};You just replace the files in the corresponding QMK folders and run the command:
qmk flash -kb handwired/dactyl_manuform/5x6 -km defaultVIA/VIAL
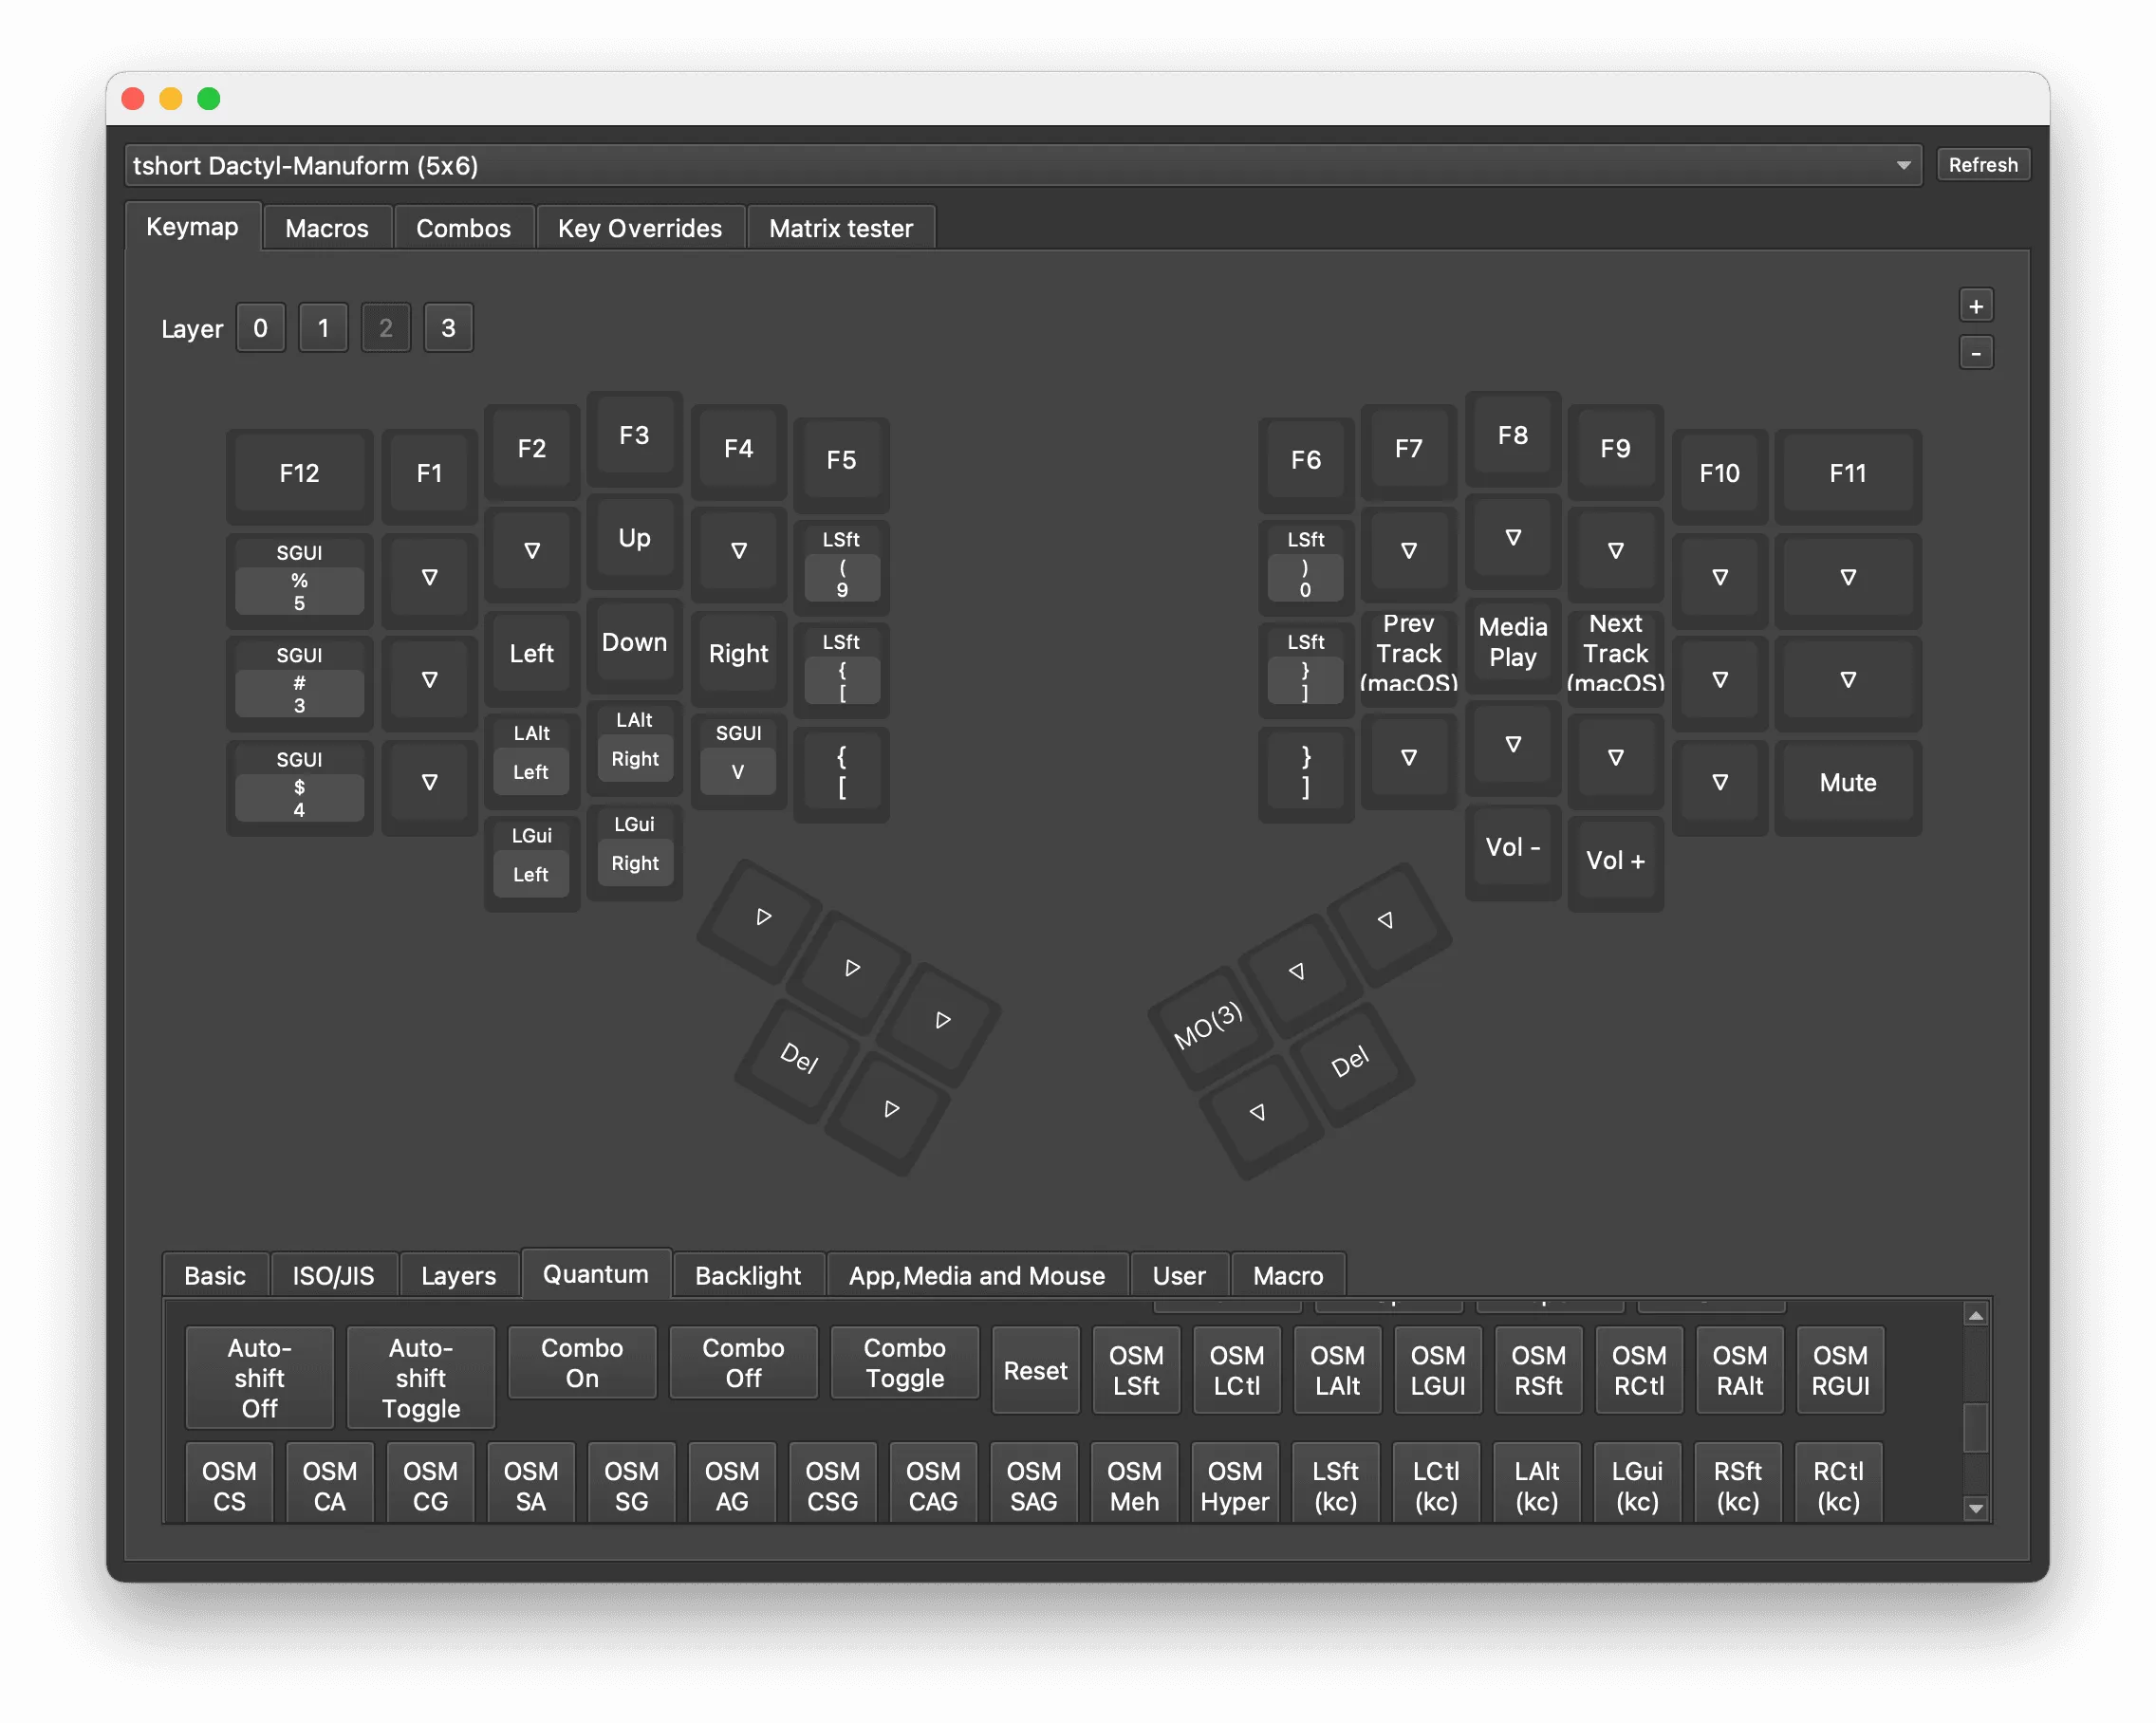
VIA is a piece of software that lets you remap keys and create layers for your keyboard through a graphical interface, without having to dive into the console and dig through text configs every time.
The feature is an absolute game-changer, especially when you need to swap a whole bunch of keys at once or set up tap-dance4 or something like that.
It’s not ready yet, but next time we’ll definitely get to it.
Review
You can see how I’ve mapped my keys in the final config section.
At the time of writing, I’ve been working exclusively on this keyboard practically every day for a month straight. And here’s what I can say about it.
Ergonomics
This is probably the most comfortable of all my ergo keyboards so far. The first couple of days were pretty rough, but my fingers found their way around fairly quickly.
The stats on monkeytype show that my average typing speed went up and my error count dropped. And it really does feel that way. When I occasionally have to switch back to my old keyboards (on the road or for whatever other reason), I immediately miss the depth — my fingers start reaching farther than they used to need to.
Layout
I mostly work on a Mac, so most of the special keys are mapped specifically for Mac. So, on my left thumb I have (left to right): CMD, Space, and Shift.
As I figured out for myself, what works best for me is having my thumb rest on the spacebar most of the time, while always being able to quickly and easily jump over to do one of the actions that need CMD or Shift. When I need both at once, there’s a backup Shift right where it usually is (in the far-left column, under the pinky).
On the right hand, the thumb mostly just handles jumping to layers 15 and 2, and, accordingly, Enter.
Honestly, I use layers very little: on the first layer I only have ` and the arrow keys, and on the second layer only mouse emulation, because sometimes it’s just insanely convenient not to reach for the mouse and instead quickly pick something with the cursor, but from the keyboard. I have a feeling that something like the Charybdis with a trackball under the right hand would work out great. And I never did put the keys under the right hand to any real use.
I haven’t yet gotten into any tricks with combo keys or anything like that (the way I have it set up on Shift on the Volucris — it’s ridiculously handy being able to toggle Caps Lock on with a double tap and then just as easily turn it off), so I can’t say anything on that front yet, but I’m planning to poke around some more.
QMK
The only thing I can compare it to is ZMK, since my two previous split keyboards both run on it.
For some reason, setting up and emulating the mouse on QMK is far nicer and more convenient than on ZMK. For whatever reason, on ZMK the mouse movement isn’t as smooth by default and there’s no acceleration, unlike on QMK.
That said, at first ZMK’s decision to keep everything in git and run the firmware build through GitHub Actions seems, to put it mildly, questionable. But you start getting used to things like the keymap editor, and you really miss them in QMK. It’s annoying that you have to do everything by hand. Although VIA looks like a full-blown solution to that problem.
Verdict
The Mini Thumb Dactyl is one of the most fiddly and most comfortable keyboards I’ve ever used. QMK on top of the rp2040 chip performs brilliantly, flashes without a fuss, and I didn’t have to drag in and debug tons of dependencies.
If you’re into mechanical keyboards and aren’t scared of soldering and 3D printing, then I wholeheartedly recommend giving this beast a shot yourself.
Take care of yourself and your loved ones.
Footnotes
-
If it feels like I’ve started speaking in ancient Sumerian, then it probably isn’t just a feeling ↩
-
I’m not entirely sure how to translate all of this properly, since I mostly read about this stuff in English, so apologies in advance if you don’t like the words I picked ↩
-
To make working with 3D models and GitHub easier, you can use my extension: Chrome and Firefox ↩
-
tap-dance is one of the features of modern firmware like QMK or ZMK that lets you do something on specific key-press combinations that normally wouldn’t work on regular keyboards. For example, double-tapping Shift toggles Caps Lock and vice versa. ↩
-
I count the base layer as layer zero, then comes the first, second, and so on. ↩